挂载与更新
挂载子节点和元素的属性
子节点:vnode 的子节点有可能是文本字符串,当然也会是标签,并且子节点可以是很多个。为了描述元素的子节点,可以使用数组来表示
属性:为了描述一个元素的属性,我们可以为虚拟 DOM 添加一个 vnode.props 字段
const vnode = {
    type: 'div',
    props: {
        id: 'foo'
    },
    children: [
        {
            type: 'p',
            children: 'hello'
        }
    ]
}
2
3
4
5
6
7
8
9
10
11
12
为了渲染子节点和属性,同时也需要修改对应的 mountElement 函数:
function mountElement(vnode, container) {
    const el = createElement(vnode.type)
    if (typeof vnode.children === 'string') {
        setElementText(el, vnode.children)
    } else if (Array.isArray(vnode.children)) {
        // 如果 children 是一个数组,则遍历每个子节点,并调用 patch 函数挂载它们
        vnode.children.forEach(child => {
            patch(null, child, el)
        })
    }
    // 如果 vnode.props 存在才处理它
    if (vnode.props) {
        // 遍历 vnode.props
        for (const key in vnode.props) {
            // 或 el[key] = vnode.props[key]
            el.setAttribute(key, vnode.props[key])
        }
    }

    insert(el, container)
}
2
3
4
5
6
7
8
9
10
11
12
13
14
15
16
17
18
19
20
21
在处理属性时,为元素设置属性无论是使用 setAttribute 函数,还是直接操作 DOM 对象,都存在缺陷。
HTML Attributes 与 DOM Properties
从最基本的 HTML 为例:
<input id="my-input" type="text" value="foo" />
HTML Attributes 指的就是定义在 HTML 标签上的属性,这里指的就是 id=“my-input”、type=“text” 和 value=“foo”。当浏览器解析这段 HTML 代码之后,可以得到该 DOM 对象:
const el = document.querySelector("#my-input");
这个 DOM 对象会包含很多属性(properties),这些属性就是所谓的 DOM Properties。
HTML Attributes 与 DOM Properties 的关联
很多 HTML Attributes 在 DOM 对象上有与之同名的 DOM Properties,如 id=“my-input” 与 el.id,type="text" 与 el.type...
但两者名字并不总是一模一样:class="foo" 与 el.className
并不是所有的 HTML Attributes 都有与之对应的 DOM Properties:aria-* 类的 HTML Attributes
也并不是所有的 DOM Properties 都有与之对应的 HTML Attributes:el.textContent 可以设置文本内容,但没有对应的 HTML Attributes
直接映射:HTML Attributes 与 DOM Properties 具有相同名称的属性,例如 id="foo" 与 el.id
两者关系
🚀 HTML Attributes 的作用是设置与之对应的 DOM Properties 的初始值。
一旦值改变,那么 DOM Properties 始终存储着当前值,而通过 getAttribute 函数得到的仍然是初始值。
<input id="foo" value="foo" />

<script>
	const el = document.querySelector("#foo")
  // 用户在输入框修改内容为 bar 后
  // 文本框内容的修改并不会影响 el.getAttribute('value') 的返回值。
  console.log(el.value)  // 'bar'
  console.log(el.getAttribute('value'))  // 'foo'
  console.log(el.defaultValue)  // 'foo'
</script>
2
3
4
5
6
7
8
9
10
这里也说明,一个 HTML Attributes 可能关联多个 DOM Properties。
默认值校验
虽然我们可以认为 HTML Attributes 是用来设置与之对应的 DOM Properties 的初始值的,但有些值是受限制的,就好像浏览器内部做了默认值校验。如果你通过 HTML Attributes 提供的默认值不合法,那么浏览器会使用内建的合法值作为对应 DOM Properties 的默认值:
<input id="my-input" type="foo" />

<script>
  const el = document.querySelector("#my-input")
  console.log(el.type)  // 'text'
</script>
2
3
4
5
6
正确地设置元素属性
浏览器解析
浏览器本身会解析 HTML 代码,自动分析 HTML Attributes 并设置合适的 DOM Properties。但是 Vue.js 的单文件组件中的模板就需要自行编译。
以禁用的按钮为例:
<button disabled>Button</button>
对于浏览器来说,当解析到这样一段 HTML,它会发现这个按钮存在 disabled 的 HTML Attributes,于是浏览器会把这个按钮设置为禁用状态,并把它的 el.disabled 这个 DOM Properties 的值设置为 true。
Vue.js 的解析
相同的模板,它会先被编译成 vnode,它等价于:
const button = {
	type: 'button',
	props: {
		disabled: ''
	}
}
2
3
4
5
6
这里 disabled 的值为空字符串,如果在渲染器中调用 setAttribute 函数设置属性,相当于:
el.setAttribute('disabled', '')
这么做是没有问题的,浏览器将会将按钮禁用。但是对于 Vue.js 来说,要考虑如下模板:
<button :disabled="false">Button</button>
它对应的 vnode 为:
const button = {
	type: 'button',
	props: {
		disabled: false
	}
}
2
3
4
5
6
这里的本意是“不禁用”按钮,但是由于 setAttribute 函数设置的值总是会被字符串化,等价于
// el.setAttribute('disabled', false)
el.setAttribute('disabled', 'false')
2
🔥 对于按钮来说,它的 el.disabled 属性值是布尔类型的,并且它不关心具体的 HTML Attributes 的值是什么,只要 disabled 属性存在,按钮就会被禁用。所以渲染器不能用 setAttribute 函数将 vnode.props 对象中的属性设置到元素上。
通用的属性设置
🚀 我们可以优先设置 DOM Properties
// ✅ <button :disabled="true">Button</button>
el.disabled = true

// ✅ <button :disabled="false">Button</button>
el.disabled = false

// 🙈 <button disabled>Button</button>
el.disabled = ''
2
3
4
5
6
7
8
🚀 但是对于 HTML Properties 是布尔值,prop 是空字符串需要特殊处理,要手动将值矫正为true。
<form id="form1"></form>
<input form="form1" />
2
在这段代码中,我们为 input 标签设置了 form 属性(HTML Properties),但是这个属性 el.form 是只读的,只能使用 setAttribute 函数设置,因此对于这些情况我们也需要特殊处理,类似的表单元素都是如此。
🚀 处理思路:可以提取一个 shouldSetAsProps 函数判断属性是否应该作为 DOM Properties 处理。
function shouldSetAsProps(el, key, value) {
  // 特殊处理
  if (key === 'form' && el.tagName === 'INPUT') return false
  // 兜底
  return key in el
}

function mountElement(vnode, container) {
  const el = createElement(vnode.type)
  // 省略 children 的处理

  if (vnode.props) {
    for (const key in vnode.props) {
      if (shouldSetAsProps(el, key, nextValue)) {
        const type = typeof el[key]
        if (type === 'boolean' && nextValue === '') {
          el[key] = true
        } else {
          el[key] = nextValue
        }
      } else {
        el.setAttribute(key, nextValue)
      }
    }
  }

  insert(el, container)
}
2
3
4
5
6
7
8
9
10
11
12
13
14
15
16
17
18
19
20
21
22
23
24
25
26
27
28
最后,我们需要把属性设置的也变成与平台无关,因此需要把属性设置的相关操作也提取到渲染选项中:
const renderer = createRenderer({
  createElement(tag) {
    return document.createElement(tag)
  },
  setElementText(el, text) {
    el.textContent = text
  },
  insert(el, parent, anchor = null) {
    parent.insertBefore(el, anchor)
  },
  // 将属性设置相关操作封装到 pathProps 函数中,并作为渲染器选项传递
  patchProps(el, key, preValue, nextValue) {
    if (shouldSetAsProps(el, key, nextValue)) {
      const type = typeof el[key]
      if (type === 'boolean' && nextValue === '') {
        el[key] = true
      } else {
        el[key] = nextValue
      }
    } else {
      el.setAttribute(key, nextValue)
    }
  }
})
2
3
4
5
6
7
8
9
10
11
12
13
14
15
16
17
18
19
20
21
22
23
24
而在 mountElement 函数中,只需要调用 patchProps 函数,并传递相关参数即可:
function mountElement(vnode, container) {
  const el = createElement(vnode.type)
  if (typeof vnode.children === 'string') {
    setElementText(el, vnode.children)
  } else if (Array.isArray(vnode.children)) {
    vnode.children.forEach(child => {
      patch(null, child, el)
    })
  }

  if (vnode.props) {
    for (const key in vnode.props) {
      patchProps(el, key, null, vnode.props[key])
    }
  }

  insert(el, container)
}
2
3
4
5
6
7
8
9
10
11
12
13
14
15
16
17
18
class 的处理
class 值处理
Vue.js 允许通过多种方式设置元素类名:
<template>
  <p class="foo bar"></p>
  <p :class="{ foo: true, bar:false}"></p>
  <p :class="arr"></p>
</template>

<script>
const arr = [
  'foo bar',
  {
    baz: true
  }
]
</script>
2
3
4
5
6
7
8
9
10
11
12
13
14
第三个 p 标签对应的 vnode 如下,我们可以封装一个 normalizeClass 函数将其处理为正常的字符串:
const vnode = {
  type: 'p',
  props: {
    class: [
      'bar foo',
      { baz: true }
    ]
  }
}
2
3
4
5
6
7
8
9
const vnode = {
  type: 'p',
  props: {
    class: normalizeClass([
      'bar foo',
      { baz: true }
    ])
  }
}
2
3
4
5
6
7
8
9
const vnode = {
  type: 'p',
  props: {
    // 序列化后的结果
    class: 'foo bar baz'
  }
}
2
3
4
5
6
7
元素设置 class
在将 vnode 的 class 值正常化之后,还要通过高效的方式把 class 设置到元素上:
| Text name | Execution per second |
|---|---|
| el.className | 9637.7 Ops/sec |
| el.classList | 5969.5 Ops/sec |
| setAttribute | 4761.1 Ops/sec |
🔥 可以发现,className 每秒设置的做多次,性能最优。因此我们需要调整 patchProps 函数的实现:
const renderer = createRenderer({
  // 省略其他平台操作 API

  patchProps(el, key, preValue, nextValue) {
    if (key === 'class') {
      el.className = nextValue || ''
    } else if (shouldSetAsProps(el, key, nextValue)) {
      const type = typeof el[key]
      if (type === 'boolean' && nextValue === '') {
        el[key] = true
      } else {
        el[key] = nextValue
      }
    } else {
      el.setAttribute(key, nextValue)
    }
  }
})
2
3
4
5
6
7
8
9
10
11
12
13
14
15
16
17
18
19
📝 可见, vnode.props 对象中定义的属性值类型并不总是与 DOM 元素属性的数据结构保持一致,这取决于上层设计。Vue.js 允许对象类型的值作为 class 是为了方便开发者,在底层实现上,必然需要对值进行正常化后再使用。另外,正常化值的过程是有代价的,如果需要大量的正常化操作,则会消耗更多的性能。
卸载操作
操作表示判断 newVNode 为空,需要把之前渲染的内容卸载,目前 render 函数直接把 innerHTML 清空。这么做是不严谨的:
- 容器的内容可能是由某个或多个组件渲染的,当卸载操作发生时,应该正确地调用这些组件的 beforeUnmount、unmounted 等声明周期函数
- 即使内容不是由组件渲染的,有的元素存在自定义指令,我们应该在卸载操作发生时正确执行对应的值令钩子函数
- 使用 innerHTML 清空容器元素内容的另外一个缺陷是,它不会移除绑定在 DOM 元素上的事件处理函数
正确的卸载方式是,根据 vnode 对象获取与其相关的真实 DOM 元素,然后使用原生 DOM 操作方法将该 DOM 元素移除。为此,我们需要在 vnode 与真实 DOM 元素之间建立联系,修改 mountElement 函数:
function mountElement(vnode, container) {
  // 让 vnode.el 引用真实 DOM 元素
  const el = vnode.el = createElement(vnode.type)
  if (typeof vnode.children === 'string') {
    setElementText(el, vnode.children)
  } else if (Array.isArray(vnode.children)) {
    vnode.children.forEach(child => {
      patch(null, child, el)
    })
  }

  if (vnode.props) {
    for (const key in vnode.props) {
      patchProps(el, key, null, vnode.props[key])
    }
  }

  insert(el, container)
}
2
3
4
5
6
7
8
9
10
11
12
13
14
15
16
17
18
19
function unmount(vnode) {
  const parent = vnode.el.parentNode
  if (parent) {
    parent.removeChild(vnode.el)
  }
}
2
3
4
5
6
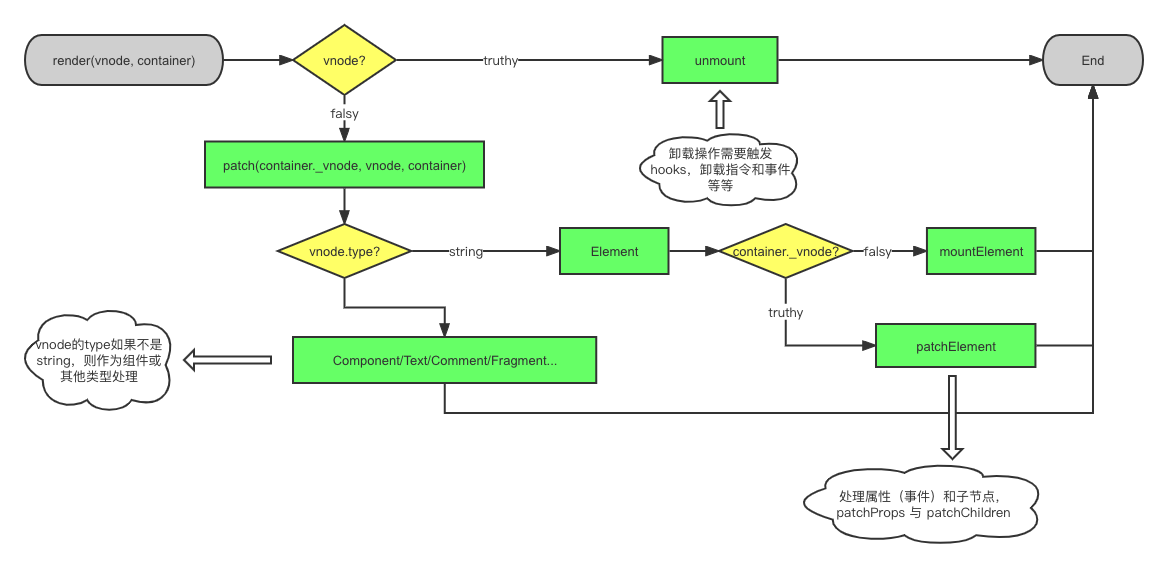
function render(vnode, container) {
  if (vnode) {
    // 新 vnode 存在,将其与旧 vnode 一起传递给 patch 函数进行打补丁
    patch(container._vnode, vnode, container)
  } else {
    if (container._vnode) {
      // 调用 unmount 函数卸载
      unmount(container._vnode)
    }
  }
  // 把 vnode 存储到 container._vnode
  container._vnode = vnode
}
2
3
4
5
6
7
8
9
10
11
12
13
将卸载操作封装到 unmount 中,还能够带来两点额外的好处:
- 在 unmount 函数内,我们有机会调用绑定在 DOM 元素上的指令钩子函数,例如 beforeUnmount、unmounted 等
- 当 unmount 函数执行时,我们有机会检测虚拟节点 vnode 的类型。如果该虚拟节点描述的是组件,则我们有机会调用组件相关的生命周期函数
区分 vode 的类型
目前,patch 函数在判断到旧 vnode 不存在时,会走 mountElement 进行挂载,否则就执行 DOM 更新逻辑。
function patch(n1, n2, container) {
  if (!n1) {
    mountElement(n2, container)
  } else {
    // 更新
  }
}
2
3
4
5
6
7
vnode 的区分处理
首先要判断新旧 vnode 所描述的内容相同,因为就不同元素来说,每个元素都有特有的属性,
否则这就是一个单纯的卸载再挂载的操作,是不需要走 patch的。
另外,vnode 可以描述普通标签、组件、Fragment等等,
所以不同类型的 vnode 我们要使用不同的挂载或者打补丁的处理方式;
function patch(n1, n2, container) {
  // 在真正执行更新操作之前,我们优先检查新旧 vnode 所描述的内容是否相同
  if (n1 && n1.type !== n2.type) {  // p\input\div...
    unmount(n1)
    n1 = null
  }

  const { type } = n2

  if (typeof type === 'string') {
    if (!n1) {
      mountElement(n2, container)
    } else {
      patchElement(n1, n2)
    }
  } else if (typeof type === 'object') {
    // 组件
  }
}
2
3
4
5
6
7
8
9
10
11
12
13
14
15
16
17
18
19
事件的处理
事件的处理与优化
事件可以视作一种特殊的属性,我们可以约定,在 vnode.props 对象中,凡是以字符 on 开头的属性都视作事件。
事件的添加可以调用 addEventListener 函数来绑定。
一个元素可以绑定多种类型的事件,对于同一类型事件而言,还可以绑定多个事件处理函数。
事件的更新按一般的思路就是先移除之前添加的事件处理函数,再绑定新的到 DOM 元素上。
这么做代码能够按照预期工作,但是有性能更优的处理办法。我们可以伪装一个事件处理函数 invoker,把真正的事件处理函数设置为 invoker.value 的值。这样在更新事件的时候,我们将不再需要调用 removeEventListener 函数来移除上一次绑定的事件,只需要更新 invoker.value 的值即可。
patchProps(el, key, prevValue, nextValue) {
  if (/^on/.test(key)) {
    // invokers 对象保存着各种事件的处理函数
    // invoker 的属性 value 属性,保存着一个或多个事件处理函数
    const invokers = el._vei || (el._vei = {})
    let invoker = invokers[key]
    const name = key.slice(2).toLowerCase()
    if (nextValue) {
      // 事件函数初始声明与绑定
      if (!invoker) {
        // invoker 声明为一个函数,触发其 value 属性保存的事件
        invoker = el._vei[key] = (e) => {
          if (Array.isArray(invoker.value)) {
            invoker.value.forEach(fn => fn(e))
          } else {
            invoker.value(e)
          }
        }
        invoker.value = nextValue
        el.addEventListener(name, invoker)
      } else {
      	// 绑定事件后续的更新,避免了一次 removeEventListener 的调用
        invoker.value = nextValue
      }
    } else if (invoker) {
      el.removeEventListener(name, invoker)
    }
  } else if (key === 'class') {
    el.className = nextValue || ''
  } else if (shouldSetAsProps(el, key, nextValue)) {
    const type = typeof el[key]
    if (type === 'boolean' && nextValue === '') {
      el[key] = true
    } else {
      el[key] = nextValue
    }
  } else {
    el.setAttribute(key, nextValue)
  }
}
2
3
4
5
6
7
8
9
10
11
12
13
14
15
16
17
18
19
20
21
22
23
24
25
26
27
28
29
30
31
32
33
34
35
36
37
38
39
40
时间冒泡与更新时机
目前的基本事件处理代码,在事件冒泡与更新时机相结合会导致的问题。
问题分析
const { effect, ref } = VueReactivity

const bol = ref(false)

effect(() => {
    // 创建 vnode
    const vnode = {
        type: 'div',
        props: bol.value ? {
            onClick: () => {
                alert('父元素 clicked')
            }
        }:{},
        children: [
            {
                type: 'p',
                props: {
                    onClick: () => {
                        bol.value = true
                    }
                },
                children: 'text'
            }
        ]
    }
    // 渲染 vnode
    renderer.render(vnode, document.querySelector('#app'))
}
2
3
4
5
6
7
8
9
10
11
12
13
14
15
16
17
18
19
20
21
22
23
24
25
26
27
28
- div 元素:它的 props 对象的值是由一个三元表达式决定的。在首次渲染时,由于 bol.value 的值为 false,所以它的 props 值是一个空对象
- p 元素:它具有 click 点击事件,并且点击它时,事件处理函数会将 bol.value 的值设置为 true
🧐 那么,当首此渲染之后,鼠标点击 p 标签, 会触发父元素div 标签的 click 事件处理函数执行吗?
⬆️ 预期是,当 p 点击时,此时的 div 标签没有绑定事件处理函数,应该什么都不会发生;但是,它竟然执行了!
⬇️ 实际上:当 p 点击时,更改了响应式数据 bol 的值,然后当前副作用函数立即重新执行,也就是更新渲染会执行,这时候由于 bol.value 的值已经是 true,会给 div 元素绑定对应的事件处理函数。当更新动作完成之后,点击事件才从 p 元素冒泡到父级 div 元素,此时的 div 在更新后已经绑定了事件处理函数,触发执行。
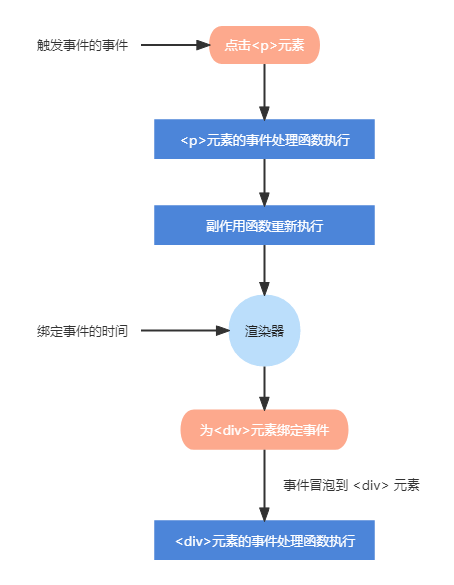
所以:div 元素绑定事件处理函数发生在事件冒泡之前。
处理
🐛 我们可以考虑把事件的绑定动作挪到事件冒泡之后,但是这个想法是不可靠的,因为我们无法判断事件冒泡是否完成,已经完成到什么程度。
🐛 另外,虽然 Vue.js 的更新是在一个异步任务队列当中进行的,但是微任务会穿插在由事件冒泡触发的多个事件处理函数之间被执行。因此,即使把绑定事件的动作放到微任务中,也无法避免这个问题。
📝 事件触发的时间是早于事件处理函数被绑定的时间的。也就是说,这个事件触发的时候,目标元素(div)上还没有绑定相关的事件处理函数。
🚀 因此,我们可以:屏蔽所以绑定时间晚于事件触发时间的事件处理函数的执行。
patchProps(el, key, prevValue, nextValue) {
  if (/^on/.test(key)) {
    const invokers = el._vei || (el._vei = {})
    let invoker = invokers[key]
    const name = key.slice(2).toLowerCase()
    if (nextValue) {
      if (!invoker) {
        invoker = el._vei[key] = (e) => {
          // 如果事件触发的时间早于事件绑定的时间,return
          if (e.timeStamp < invoker.attached) return
          if (Array.isArray(invoker.value)) {
            invoker.value.forEach(fn => fn(e))
          } else {
            invoker.value(e)
          }
        }
        invoker.value = nextValue
        // 添加 invoker.attached 属性,存储事件处理函数被绑定的时间
        invoker.attached = performance.now()
        el.addEventListener(name, invoker)
      } else {
        invoker.value = nextValue
      }
    } else if (invoker) {
      el.removeEventListener(name, invoker)
    }
  } else if (key === 'class') {
    el.className = nextValue || ''
  } else if (shouldSetAsProps(el, key, nextValue)) {
    const type = typeof el[key]
    if (type === 'boolean' && nextValue === '') {
      el[key] = true
    } else {
      el[key] = nextValue
    }
  } else {
    el.setAttribute(key, nextValue)
  }
}
2
3
4
5
6
7
8
9
10
11
12
13
14
15
16
17
18
19
20
21
22
23
24
25
26
27
28
29
30
31
32
33
34
35
36
37
38
39
我们只需要为伪造的事件处理函数添加一个 attached 属性,用来存储当前事件处理函数被绑定的时间。因为 event 对象的 timestamp 可以获取到事件发生的时间,那么就可以拦截到早于事件绑定时间触发的事件。
根据浏览器的不同,e.timestamp 可能是 performance.now(高精时间),也可能不是。这里应该要做兼容处理。在 Chrome 49、Firefox 54、Opera 36 之后的版本中,e.timestamp 都是高精时间。
更新子节点
子节点类型
- 没有子节点,此时 vnode.children 的值为 null
- 具有文本子节点,此时 vnode.children 的值为字符串,代表文本内容
- 其他情况,无论是单个子节点,还是多个子节点(可能是文本和元素的混合),都可以用数组表示
const vnode = {
  type: 'div',
  children: null
}
2
3
4
const vnode = {
  type: 'div',
  children: 'Jerry Chen'
}
2
3
4
const vnode = {
  type: 'div',
  children: [
    { type: 'p' },
    'Hello World'
  ]
}
2
3
4
5
6
7
当渲染器执行更新时,就会出现九种可能:
function patchElement(n1, n2) {
  const el = n2.el = n1.el
  const oldProps = n1.props
  const newProps = n2.props
  // 第一步:更新 props,属性打补丁+属性卸载
  for (const key in newProps) {
    if (newProps[key] !== oldProps[key]) {
      patchProps(el, key, oldProps[key], newProps[key])
    }
  }
  for (const key in oldProps) {
    if (!(key in newProps)) {
      patchProps(el, key, oldProps[key], null)
    }
  }
  // 第二步:更新 children
  patchChildren(n1, n2, el)
}
2
3
4
5
6
7
8
9
10
11
12
13
14
15
16
17
18
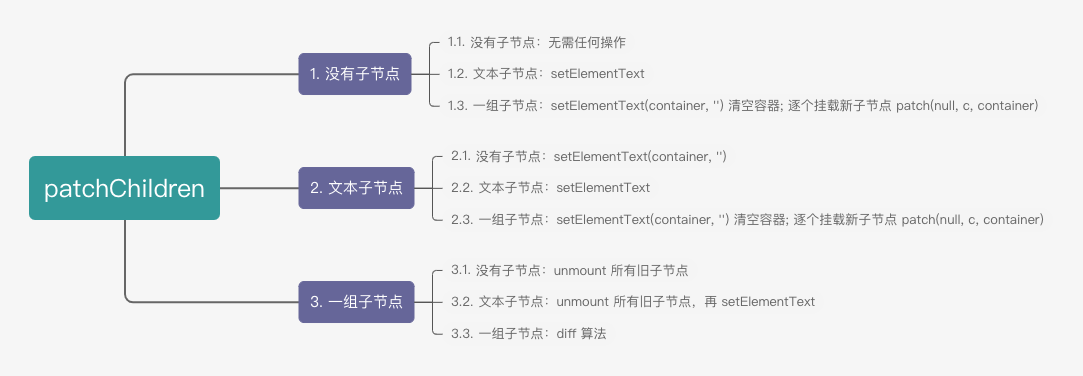
function patchChildren(n1, n2, container) {
  if (typeof n2.children === 'string') {
    if (Array.isArray(n1.children)) {
      n1.children.forEach((c) => unmount(c))
    }
    setElementText(container, n2.children)
  } else if (Array.isArray(n2.children)) {
    if (Array.isArray(n1.children)) {
      n1.children.forEach(c => unmount(c))
      n2.children.forEach(c => patch(null, c, container))
    } else {
      setElementText(container, '')
      n2.children.forEach(c => patch(null, c, container))
    }
  } else {
    if (Array.isArray(n1.children)) {
      n1.children.forEach(c => unmount(c))
    } else if (typeof n1.children === 'string') {
      setElementText(container, '')
    }
  }
}
2
3
4
5
6
7
8
9
10
11
12
13
14
15
16
17
18
19
20
21
22
文本节点和注释节点
虚拟 DOM 可以描述更多的真实 DOM,以下是文本节点的表示:
const Text = Symbol()
const newVnode = {
  type: Text,
  children: 'Some Text'
}
renderer.render(newVnode, document.querySelector('#app'))
2
3
4
5
6
那么在 patch 函数中,我们就可以增加一个判断分支来处理 vnode.type 为文本的情况:
function patch(n1, n2, container) {
  if (n1 && n1.type !== n2.type) {
    unmount(n1)
    n1 = null
  }

  const { type } = n2

  if (typeof type === 'string') {
    if (!n1) {
      mountElement(n2, container)
    } else {
      patchElement(n1, n2)
    }
  } else if (type === Text) {
    // 如果没有旧节点,则进行挂载
    if (!n1) {
      // 文本创建与插入
      const el = n2.el = createText(n2.children)
      insert(el, container)
    } else {
      // 如果旧 vnode 存在,直接更新其文本内容即可
      const el = n2.el = n1.el
      if (n2.children !== n1.children) {
        setText(el, n2.children)
      }
    }
  }
}
2
3
4
5
6
7
8
9
10
11
12
13
14
15
16
17
18
19
20
21
22
23
24
25
26
27
28
29
const renderer = createRenderer({
  createElement(tag) {
    return document.createElement(tag)
  },
  setElementText(el, text) {
    el.textContent = text
  },
  insert(el, parent, anchor = null) {
    parent.insertBefore(el, anchor)
  },
  // 创建一个文本节点并返回
  createText(text) {
    return document.createTextNode(text)
  },
  // 更新 DOM 文本内容
  setText(el, text) {
    el.nodeValue = text
  },
  patchProps(el, key, prevValue, nextValue) { /*...*/ }
})
2
3
4
5
6
7
8
9
10
11
12
13
14
15
16
17
18
19
20
Fragment
Fragment(片段)是Vue.js 3 中新增的一个 vnode 类型,可以通过它描述多根节点模板。对于Fragment 类型的 vnode 来说,它的 children 存储的内容就是模板中所有根节点:
<template>
  <li>1</li>
  <li>2</li>
  <li>3</li>
</template>
2
3
4
5
const Fragment = Symbol()
const vnode = {
  type: Fragment,
  children: [
    { type: 'li', children: '1' },
    { type: 'li', children: '2' },
    { type: 'li', children: '3' }
  ]
}
2
3
4
5
6
7
8
9
function patch(n1, n2, container) {
  if (n1 && n1.type !== n2.type) {
    unmount(n1)
    n1 = null
  }

  const { type } = n2

  if (typeof type === 'string') {
    if (!n1) {
      mountElement(n2, container)
    } else {
      patchElement(n1, n2)
    }
  } else if (type === Text) {
    if (!n1) {
      const el = n2.el = createText(n2.children)
      insert(el, container)
    } else {
      const el = n2.el = n1.el
      if (n2.children !== n1.children) {
        setText(el, n2.children)
      }
    }
  } else if (type === Fragment) {
    if (!n1) {
      // 旧 vnode 不存在,将 Fragment 的 children 逐个挂载
      n2.children.forEach(c => patch(null, c, container))
    } else {
      // 旧 vnode 存在,更新 Fragment 的 children
      patchChildren(n1, n2, container)
    }
  }
}
2
3
4
5
6
7
8
9
10
11
12
13
14
15
16
17
18
19
20
21
22
23
24
25
26
27
28
29
30
31
32
33
34
function unmount(vnode) {
  // Fragment 的处理
  if (vnode.type === Fragment) {
    vnode.children.forEach(c => unmount(c))
    return
  }
  const parent = vnode.el.parentNode
  if (parent) {
    parent.removeChild(vnode.el)
  }
}
2
3
4
5
6
7
8
9
10
11
当卸载 Fragment 类型的虚拟节点时,由于 Fragment 本身并不会渲染任何真实 DOM,所以只需要遍历它的 children 数组逐一卸载即可