class
📌 class 是语法糖,实际上的原理就是prototype
constructor
class User {
  constructor(name) {
    this.name = name;
    this.show = function() {};
  }
  getName() {
    return this.name;
  }
}
const u = new User("Jerry Chen");
console.log(u);
2
3
4
5
6
7
8
9
10
11
constructor
在构造函数constructor内部this赋值的部分为实例属性
除了constructor声明的方法为class的原型方法,实例原型共享
构造函数具有默认值,不是必须定义的
constructor(...args) {
  super(...args);
}
1
2
3
原理分析
类其实是函数
class User {}
console.log(typeof User); // function
1
2与ES5构造函数相同,class原型的constructor就是class本身
class User {
  constructor(name) {
    this.name = name;
  }
  show() {}
}
console.log(User == User.prototype.constructor); //true

//下面是对比的普通函数
function Person(name) {
  this.name = name;
}
console.log(Person == Person.prototype.constructor); //true
1
2
3
4
5
6
7
8
9
10
11
12
13在类中定义的方法也保存在函数原型
class User {
  constructor(name) {
    this.name = name;
    this.show = function() {};
  }
  getName() {
    return this.name;
  }
}
const u = new User("Jerry Chen");
console.log(Object.getOwnPropertyNames(User.prototype)); // ["constructor", "getName"]
1
2
3
4
5
6
7
8
9
10
11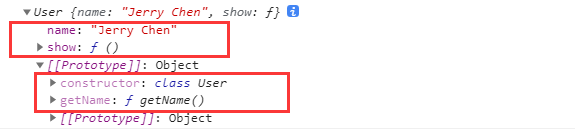
所以下面定义的类:
class User {
  constructor(name) {
    this.name = name;
  }
  show() {
    console.log(this.name);
  }
}
1
2
3
4
5
6
7
8与下面使用函数的定义是一致的:
function User(name) {
  this.name = name;
}
User.prototype.show = function() {
  console.log(this.name);
};
1
2
3
4
5
6
属性与方法
属性可以在constructor内部添加,也可以在constructor外声明
class User {
  site = "blog.caffreygo.com";
  constructor(name) {
    this.name = name;
  }
  show() {
    console.log(this.site + ":" + this.name);
  }
}

let u = new User("Jerry Chen")
2
3
4
5
6
7
8
9
10
11
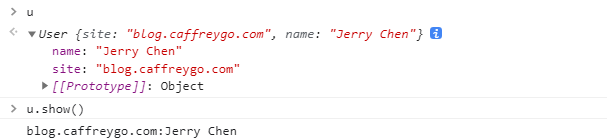
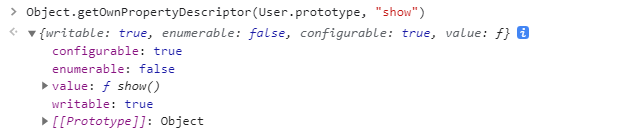
与ES5构造函数不同,class的方法不可枚举
class User {
    constructor(name) {
        this.name = name;
    }
    show() {
        console.log(this.name);
    }
}
let u = new User("Jerry Chen");
for (const key in u) {
    console.log(key);    // name
}

function Person(name) {
    this.name = name;
}
Person.prototype.show = function() {
    console.log(this.name);
};
let obj = new Person("caffreygo");
for (const key in obj) {
    console.log(key);     // name show
}
2
3
4
5
6
7
8
9
10
11
12
13
14
15
16
17
18
19
20
21
22
23
严格模式
class 默认使用strict 严格模式执行
class User {
    constructor(name) {
        this.name = name;
    }
    show() {
        function test() {
            //严格模式下输出 undefined
            console.log(this);
        }
        test();
    }
}
let u = new User("Jerry Chen");
u.show();   // undefined

function Person(name) {
    this.name = name;
}
Person.prototype.show = function() {
    function test() {
        //非严格模式输出 Window
        console.log(this);
    }
    test();
};
let obj = new Person("caffreygo");
obj.show();  // window
2
3
4
5
6
7
8
9
10
11
12
13
14
15
16
17
18
19
20
21
22
23
24
25
26
27
静态属性
静态属性就是把class看作对象,直接在class对象上添加对象的属性,也通过class直接访问
🔰 基于ES5构造函数的原理
function User() {}
User.site = "baidu.com";

const u = new User();
console.log(u.site);    // undefiend
console.log(User.site); // baidu.com
2
3
4
5
6
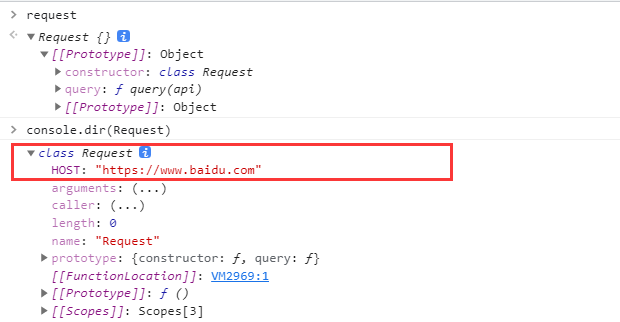
🔰 通过static关键字声明静态属性
class Request {
    static HOST = "https://www.baidu.com";

    query(api) {
        return Request.HOST + "/" + api;
    }
}

let request = new Request();
console.log(request)
console.dir(Request)
2
3
4
5
6
7
8
9
10
11
静态方法
📌 一般来讲方法不需要对象属性参与计算就可以定义为静态方法
🔰 下面是静态方法实现原理
function User() {
  this.show = function() {
    return "this is a object function";
  };
}
User.show = function() {
  return "welcome to VC";
};
const u = new User();
console.dir(u.show());    //this is a object function
console.dir(User.show()); // welcome to VC
2
3
4
5
6
7
8
9
10
11
🔰 在 class 内声明的方法前使用 static 定义的方法即是静态方法
class User {
  constructor(name) {
    this.name = name;
  }
  static create(name) {
    return new User(name);    // return new this(name);
  }
}
2
3
4
5
6
7
8
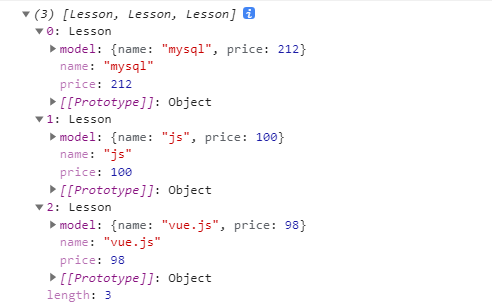
🔰 下面使用静态方法在课程类中的使用
const data = [
  { name: "js", price: 100 },
  { name: "mysql", price: 212 },
  { name: "vue.js", price: 98 }
];
class Lesson {
  constructor(data) {
    this.model = data;
  }
  get price() {
    return this.model.price;
  }
  get name() {
    return this.model.name;
  }
  //批量生成对象
  static createBatch(data) {
    return data.map(item => new Lesson(item));
  }
  //最贵的课程
  static MaxPrice(collection) {
    return collection.sort((a, b) => b.price - a.price)[0];
  }
}
const lessons = Lesson.createBatch(data);
console.log(lessons);
console.log(Lesson.MaxPrice(lessons).name);   // mysql
2
3
4
5
6
7
8
9
10
11
12
13
14
15
16
17
18
19
20
21
22
23
24
25
26
27
访问器
📌 使用访问器可以对对象的属性进行访问控制
- 使用访问器可以管控属性,有效的防止属性随意修改
- 访问器就是在函数前加上
get/set修饰,操作属性时不需要加函数的扩号,直接用函数名
class User {
  constructor(name) {
    this.data = { name };
  }
  get name() {        // getter
    return this.data.name;
  }
  set name(value) {   // setter
    if (value.trim() == "") throw new Error("invalid params");
    this.data.name = value;
  }
}
let u = new User("Jerry Chen");
u.name = "caffreygo";
console.log(u.name);  // caffreygo
2
3
4
5
6
7
8
9
10
11
12
13
14
15
访问控制
public
📌 public 指不受保护的属性,在类的内部与外部都可以访问到
class User {
  url = "baidu.com";
  constructor(name) {
    this.name = name;
  }
}
let u = new User("Jerry Chen");
console.log(u.name, u.url);  // Jerry Chen baidu.com
2
3
4
5
6
7
8
protected
📌 protected是受保护的属性修释,不允许外部直接操作,但可以继承后在类内部访问,有以下几种方式定义
命名保护
📌 将属性定义为以 _ 开始,来告诉使用者这是一个私有属性,请不要在外部使用。
- 外部修改私有属性时可以使用访问器
setter操作 - 但这只是提示,用户如果要改也没办法,我们可以为setter加上校验规则
- 继承时可以使用
class Common {
    _host = "https://baidu.com";
	set host(url) {
        if (!/^https:\/\//i.test(url)) {
            throw new Error("网址错误");
        }
        this._host = url;
    }
}
class Article extends Common {
    lists() {
        return `${this._host}/article`;
    }
}
let article = new Article();
console.log(article.lists()); //https://baidu.com/article
article.host = "https://google.com";
console.log(article.lists()); //https://google.com/article
2
3
4
5
6
7
8
9
10
11
12
13
14
15
16
17
18
Symbol
下面是使用 Symbol定义私有访问属性,即在外部通过查看对象结构无法获取的属性
const protecteds = Symbol();
class Common {
  constructor() {
    this[protecteds] = {};
    this[protecteds].host = "https://baidu.com";
  }
  set host(url) {
    if (!/^https?:/i.test(url)) {
      throw new Error("非常网址");
    }
    this[protecteds].host = url;
  }
  get host() {
    return this[protecteds].host;
  }
}
class User extends Common {
  constructor(name) {
    super();
    this[protecteds].name = name;
  }
  get name() {
    return this[protecteds].name;
  }
}
let u = new User("Jerry Chen");
u.host = "https://google.com";

console.log(u.name);   // Jerry Chen
console.log(u.host);   // https://google.com
2
3
4
5
6
7
8
9
10
11
12
13
14
15
16
17
18
19
20
21
22
23
24
25
26
27
28
29
30
WeakMap
WeakMap 是一组 对象键/值 对的集,下面利用WeakMap类型特性定义私有属性
const protecteds = new WeakMap();
class Common {
  constructor() {
    protecteds.set(this, {
      host: "https://baidu.com",
      port: "80"
    });
  }
  set host(url) {
    if (!/^https:\/\//i.test(url)) {
      throw new Error("网址错误");
    }
    protecteds.set(this, { ...protecteds.get(this), host: url });
  }
}
class Article extends Common {
  constructor() {
    super();
  }
  lists() {
    return `${protecteds.get(this).host}/article`;
  }
}
let article = new Article();
console.log(article.lists()); // https://baidu.com/article
article.host = "https://google.com";
console.log(article.lists()); // https://google.com/article
2
3
4
5
6
7
8
9
10
11
12
13
14
15
16
17
18
19
20
21
22
23
24
25
26
27
继承
属性继承
属性继承的原型如下
- 初始化一个空对象
- 将空对象指向User的this
- 将User和Admin的属性分别添加到对象当中
function User(name) {
  this.name = name;
}
function Admin(name) {
  User.call(this, name);
}
let u = new Admin("Jerry Chen");
console.log(u);  // { name: "Jerry Chen" }
2
3
4
5
6
7
8
这就解释了为什么在子类构造函数中要先执行super
class User {
  constructor(name) {
    this.name = name;
  }
}
class Admin extends User {
  constructor(name) {
    super(name);
  }
}
2
3
4
5
6
7
8
9
10
继承原理
class User {
  show() {
    console.log("user.show");
  }
}
class Admin extends User {
  info() {
    this.show();
  }
}
let a = new Admin();
2
3
4
5
6
7
8
9
10
11
方法继承
📌 原生的继承主要是操作原型链,实现起来比较麻烦,使用 class 就要简单的多了。
- 继承时必须在子类构造函数中调用 super() 执行父类构造函数
- super.show() 执行父类方法
下面是子类继承了父类的方法show
class Person {
  constructor(name) {
    this.name = name;
  }
  show() {
    return `你好: ${this.name}`;
  }
}
class User extends Person {
  constructor(name) {
    super(name);
  }
  run() {
    return super.show();
  }
}
const u = new User("Jerry Chen");
u.run();   // "你好: Jerry Chen"
2
3
4
5
6
7
8
9
10
11
12
13
14
15
16
17
18
✔️ 可以使用 extends 继承表达式返回的类
function controller() {
  return class {
    show() {
      console.log("user.show");
    }
  };
}
class Admin extends controller() {
  info() {
    this.show();
  }
}
2
3
4
5
6
7
8
9
10
11
12
super
📌this指向当前对象,结果并不是 admin的name值
let user = {
  name: "user",
  show() {
    return this.name;
  }
};
let admin = {
  __proto__: user,
  name: "admin",
  show() {
    return this.__proto__.show();   // this谁调用指向谁,这边指向user
  }
};
console.log(admin.show());   // user
2
3
4
5
6
7
8
9
10
11
12
13
14
为了解决以上问题,需要调用父类方法时传递this
let user = {
  name: "user",
  show() {
    return this.name;
  }
};
let admin = {
  __proto__: user,
  name: "admin",
  show() {
    return this.__proto__.show.call(this);  // 通过call绑定this
  }
};
console.log(admin.show());  // admin
2
3
4
5
6
7
8
9
10
11
12
13
14
上面看似结果正常,但如果是多层继承时,会出现新的问题
📌 因为始终传递的是当前对象this ,造成从 this 原型循环调用
let common = {
  show() {
    console.log("common.init");
  }
};
let user = {
  __proto__: common,
  name: "user",
  show() {
    return this.__proto__.show.call(this);  // 这边this通过admin传入绑定为admin, 陷入死循环
  }
};
let admin = {
  __proto__: user,
  name: "admin",
  get() {
    return this.__proto__.show.call(this);
  }
};
console.log(admin.get());  // Maximum call stack size exceeded
2
3
4
5
6
7
8
9
10
11
12
13
14
15
16
17
18
19
20
super关键字
- 使用
super调用时,在所有继承中this始终为调用对象 super是用来查找当前对象的原型,而不像上面使用this查找原型造成死循环- 也就是说把查询原型方法的事情交给了
super,this只是单纯的调用对象在各个继承中使用
let common = {
  show() {
    return this.name;
  }
};
let user = {
  __proto__: common,
  name: "user",
  show() {
    return super.show(this);    // super
  }
};
let admin = {
  __proto__: user,
  name: "admin",
  get() {
    return super.show();   // super
  }
};
console.log(admin.get());
2
3
4
5
6
7
8
9
10
11
12
13
14
15
16
17
18
19
20
📌 super 只能在类或对象的方法中使用,而不能在函数中使用,下面将产生错误
let user = {
  name: "user",
  show() {
    return this.name;
  }
};
let admin = {
  __proto__: user,
  name: "admin",
  get: function() {
    return super.show();
  }
};
console.log(admin.get()); //Uncaught SyntaxError: 'super' keyword unexpected here
2
3
4
5
6
7
8
9
10
11
12
13
14
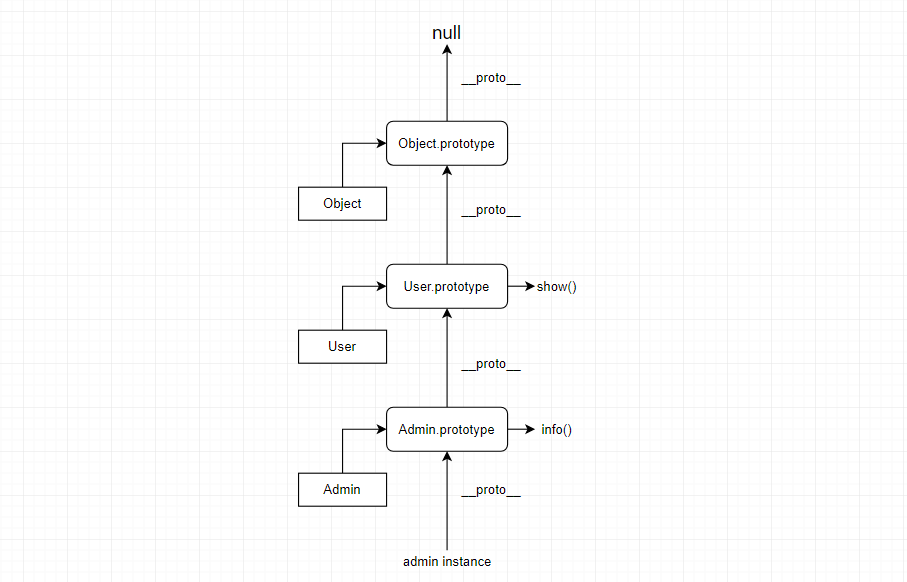
constructor
🔰 super 指调父类引用,在构造函数constructor 中必须先调用super()
super()指调用父类的构造函数- 必须在
constructor函数里的this调用前执行super()
class User {
  constructor(name) {
    this.name = name;
  }
  show() {
    console.log(this.name);
  }
}
class Admin extends User {
  constructor(name) {
    super(name);    // 子类构造函数当中必须先调用super(...args)
    // ....
  }
}
2
3
4
5
6
7
8
9
10
11
12
13
14
📗 constructor 中先调用 super 方法的原理如下
function Parent(name) {
  this.name = name;
}
function User(...args) {
  Parent.apply(this, args); // Parent.call(this, ...args)  将Parent需要初始化的属性添加到实例当中
  // user...
}
User.prototype = Object.create(User.prototype)  // 通过原型继承共享Parent prototype上的方法
User.prototype.constructor = User;  // User prototype指定constructor属性,同时可以添加User的原型方法等
2
3
4
5
6
7
8
9
父类方法
使用super 可以执行父类方法
- 不添加方法名是只调用父类构造函数
class User {
  constructor(name) {
    this.name = name;
  }
  getName() {
    return this.name;
  }
}
class Admin extends User {
  constructor(name) {
    super(name); // super()调用父类构造函数, super.method()调用父类方法
  }
}
2
3
4
5
6
7
8
9
10
11
12
13
下面是通过父类方法获取课程总价
class Controller {
  sum() {
    return this.data.reduce((t, c) => t + c.price, 0);
  }
}
class Lesson extends Controller {
  constructor(lessons) {
    super();
    this.data = lessons;
  }
  info() {
    return {
      totalPrice: super.sum(),  // 在子类方法中调用父类方法
      data: this.data
    };
  }
}
let data = [
  { name: "js", price: 100 },
  { name: "mysql", price: 212 },
  { name: "vue.js", price: 98 }
];
const l = new Lesson(data);
console.log(l.info());  // { totalPrice:431, data: Array(3) }
2
3
4
5
6
7
8
9
10
11
12
13
14
15
16
17
18
19
20
21
22
23
24
方法覆盖
子类存在父类同名方法时使用子类方法
class User {
  constructor(name) {
    this.name = name;
  }
  say() {
    return this.name;
  }
}
class Admin extends User {
  constructor(name) {
    super(name);
  }
  say() {
    return "Hello:" + super.say();  // 重写父类的方法
  }
}
2
3
4
5
6
7
8
9
10
11
12
13
14
15
16
下面是覆盖父类方法,只获取课程名称
class Controller {
  say() {
    return this.name;
  }
  total() {
    return this.data.reduce((t, c) => t + c.price, 0);
  }
  getByKey(key) {
    return this.data.filter(item => item.name.includes(key));  // 返回对象数组
  }
}
class Lesson extends Controller {
  constructor(lessons) {
    super();
    this.data = lessons;
  }
  getByKey(key) {
    return super.getByKey(key).map(item => item.name);  // 转成string数组
  }
}
let data = [
  { name: "js", price: 100 },
  { name: "mysql", price: 212 },
  { name: "vue.js", price: 98 }
];
const l = new Lesson(data);
console.log(l.getByKey("js"));  ["js", "vue.js"]
2
3
4
5
6
7
8
9
10
11
12
13
14
15
16
17
18
19
20
21
22
23
24
25
26
27
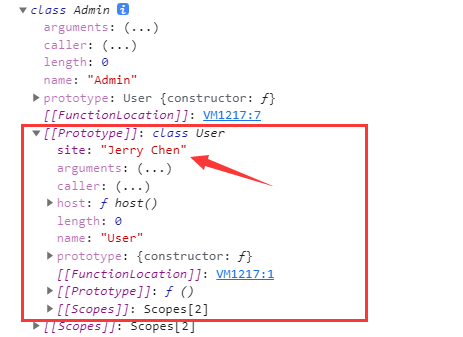
静态继承
📗 静态的属性和方法也是可以被继承使用的,下面是原理分析
function User() {}
User.site = "Caffreygo";
User.url = function() {
    return "baidu.com";
};
function Admin() {}
Admin.__proto__ = User;   // 静态属性和方法是将构造函数当作对象,直接添加属性;继承只要通过对象的__proto__属性指定原型即可实现
console.dir(Admin);
console.log(Admin.url());
2
3
4
5
6
7
8
9
✔️ 下面使用 class 来演示静态继承
class User {
  static site = "Jerry Chen";
  static host() {
    return "blog.caffreygo.com";
  }
}
class Admin extends User {}

console.log(Admin.__proto__ == User)   // true
2
3
4
5
6
7
8
9
对象检测
instanceof
📗 使用 instanceof 用于检测,下面是在原型中的分析
function User() {}
function Admin() {}
Admin.prototype = Object.create(User.prototype);
let u = new Admin();
console.log(u instanceof Admin); //true
console.log(u instanceof User);  //true

console.log(u.__proto__ == Admin.prototype);  // true
console.log(u.__proto__.__proto__ == User.prototype);  // true
2
3
4
5
6
7
8
9
🔍 下面是递归检测原型的代码,帮助你分析 instanceof 的原理
function checkPrototype(obj, constructor) {
  if (!obj.__proto__) return false;
  if (obj.__proto__ == constructor.prototype) return true;
  return checkPrototype(obj.__proto__, constructor);
}
2
3
4
5
📌 class 内部实现就是基于原型,所以使用instanceof 判断和上面原型是一样的
class User {}
class Admin extends User {}
let u = new Admin();
console.log(u instanceof Admin);  // true
console.log(u instanceof User);   // true
2
3
4
5
isPrototypeOf
📗 使用 isPrototypeOf 判断一个对象是否在另一个对象的原型链中,下面是原理分析
const a = {};
const b = {
  __proto__: a
};
const c = {
  __proto__: b
};
console.log(a.isPrototypeOf(b)); //true
console.log(a.isPrototypeOf(c)); //true
2
3
4
5
6
7
8
9
📌 下面在使用 class 语法中使用
class User {}
class Admin extends User {}
let a = new Admin();
console.log(Admin.prototype.isPrototypeOf(a));
console.log(User.prototype.isPrototypeOf(a));
2
3
4
5
继承内置类
⚙️ 使用原型扩展内置类 Array
function Arr(...args) {
  args.forEach(item => this.push(item));   // this已经是一个[]空数组
  this.first = function() {
    return this[0];
  };
  this.max = function() {
    return this.data.sort((a, b) => b - a)[0];
  };
}
let a = [1, 23];
Arr.prototype = Object.create(Array.prototype);  // Arr继承了Array的原型
let arr = new Arr("Jerry", 2, 3);
console.log(arr.first());  // "Jerry"
2
3
4
5
6
7
8
9
10
11
12
13
使用 class扩展内置类
class NewArr extends Array {
  constructor(...args) {
    super(...args);   // new Array(...args) 初始化一个新数组
  }
  first() {
    return this[0];
  }
  add(value) {
    this.push(value);
  }
  remove(value) {
    let pos = this.findIndex(curValue => {
      return curValue == value;
    });
    this.splice(pos, 1);
  }
}
let u = new NewArr(5, 3, 2, 1);
console.log(u.length); //4
console.log(u.first()); //5

u.add("Jerry");
console.log(u.join(",")); //5,3,2,1,Jerry

u.remove("3");
console.log(u.join(",")); //5,2,1,Jerry
2
3
4
5
6
7
8
9
10
11
12
13
14
15
16
17
18
19
20
21
22
23
24
25
26
mixin
mixin
关于mixin 的使用在原型章节已经讨论过,在class 使用也是相同的原理
JS不能实现多继承,如果要使用多个类的方法时可以使用mixin混合模式来完成。
mixin类是一个包含许多供其它类使用的方法的类mixin类不用来继承做为其它类的父类
const Tool = {
  max(key) {
    return this.data.sort((a, b) => b[key] - a[key])[0];
  }
};

class Lesson {
  constructor(lessons) {
    this.lessons = lessons;
  }
  get data() {
    return this.lessons;
  }
}

Object.assign(Lesson.prototype, Tool);  // 通过Object.assign为原型扩展方法
const data = [
  { name: "js", price: 100 },
  { name: "mysql", price: 212 },
  { name: "vue.js", price: 98 }
];
let u = new Lesson(data);
console.log(u.max("price"));
2
3
4
5
6
7
8
9
10
11
12
13
14
15
16
17
18
19
20
21
22
23
实例操作

<!DOCTYPE html>
<html lang="en">

<head>
  <meta charset="UTF-8">
  <meta http-equiv="X-UA-Compatible" content="IE=edge">
  <meta name="viewport" content="width=device-width, initial-scale=1.0">
  <title>Document</title>
  <style>
    * {
      padding: 0;
      margin: 0;
      box-sizing: content-box;
    }

    body {
      padding: 30px;
    }

    .slide {
      width: 300px;
      display: flex;
      flex-direction: column;
      /* box-shadow: 0px 0px 10px rgba(0, 0, 0, 0.3); */
    }

    .slide dt {
      height: 30px;
      background: #34495e;
      color: white;
      display: flex;
      align-items: center;
      padding-left: 10px;
      cursor: pointer;
    }

    .slide dt:first-of-type {
      border-top-left-radius: 10px;
      border-top-right-radius: 10px;
    }

    .slide dd {
      height: 100px;
      background: #f1c40f;
      overflow: hidden;
    }

    .slide dd div {
      padding: 10px;
    }

    .slide dd:last-of-type {
      border-bottom-left-radius: 10px;
      border-bottom-right-radius: 10px;
    }
  </style>
</head>

<body>
  <div class="slide s1">
    <dt>Jerry Chen</dt>
    <dd>
      <div>blog.caffreygo.com</div>
    </dd>
    <dt>Google</dt>
    <dd>
      <div>google.com</div>
    </dd>
    <dt>Media</dt>
    <dd>
      <div>youtube.com</div>
    </dd>
  </div>
</body>
<script>
  class Animation {
    constructor(el) {
      this.el = el;
      this.timeout = 5;
      this.isShow = true;
      this.defaultHeight = this.height;
    }
    hide(callback) {
      this.isShow = false;
      let id = setInterval(() => {
        if (this.height <= 0) {
          clearInterval(id);
          callback && callback();
          return;
        }
        this.height = this.height - 1;
      }, this.timeout);
    }
    show(callback) {
      this.isShow = false;
      let id = setInterval(() => {
        if (this.height >= this.defaultHeight) {
          clearInterval(id);
          callback && callback();
          return;
        }
        this.height = this.height + 1;
      }, this.timeout);
    }
    get height() {
      return window.getComputedStyle(this.el).height.slice(0, -2) * 1;
    }
    set height(height) {
      this.el.style.height = height + "px";
    }
  }
  class Slide {
    constructor(el) {
      this.el = document.querySelector(el);
      this.links = this.el.querySelectorAll("dt");
      this.panels = [...this.el.querySelectorAll("dd")].map(
        item => new Panel(item)
      );
      this.bind();
    }
    bind() {
      this.links.forEach((item, i) => {
        item.addEventListener("click", () => {
          this.action(i);
        });
      });
    }
    action(i) {
      Panel.hideAll(Panel.filter(this.panels, i), () => {
        this.panels[i].show();
      });
    }
  }
  class Panel extends Animation {
    static num = 0;
    static hideAll(items, callback) {
      if (Panel.num > 0) return;
      items.forEach(item => {
        Panel.num++;
        item.hide(() => {
          Panel.num--;
        });
      });
      callback && callback();
    }
    static filter(items, i) {
      return items.filter((item, index) => index != i);
    }
  }
  let u = new Slide(".s1");
</script>

</html>
2
3
4
5
6
7
8
9
10
11
12
13
14
15
16
17
18
19
20
21
22
23
24
25
26
27
28
29
30
31
32
33
34
35
36
37
38
39
40
41
42
43
44
45
46
47
48
49
50
51
52
53
54
55
56
57
58
59
60
61
62
63
64
65
66
67
68
69
70
71
72
73
74
75
76
77
78
79
80
81
82
83
84
85
86
87
88
89
90
91
92
93
94
95
96
97
98
99
100
101
102
103
104
105
106
107
108
109
110
111
112
113
114
115
116
117
118
119
120
121
122
123
124
125
126
127
128
129
130
131
132
133
134
135
136
137
138
139
140
141
142
143
144
145
146
147
148
149
150
151
152
153