NestJs
Nest.js (opens new window)在新窗口打开用于构建高效且可伸缩的服务端应用程序的渐进式 Node.js 框架。
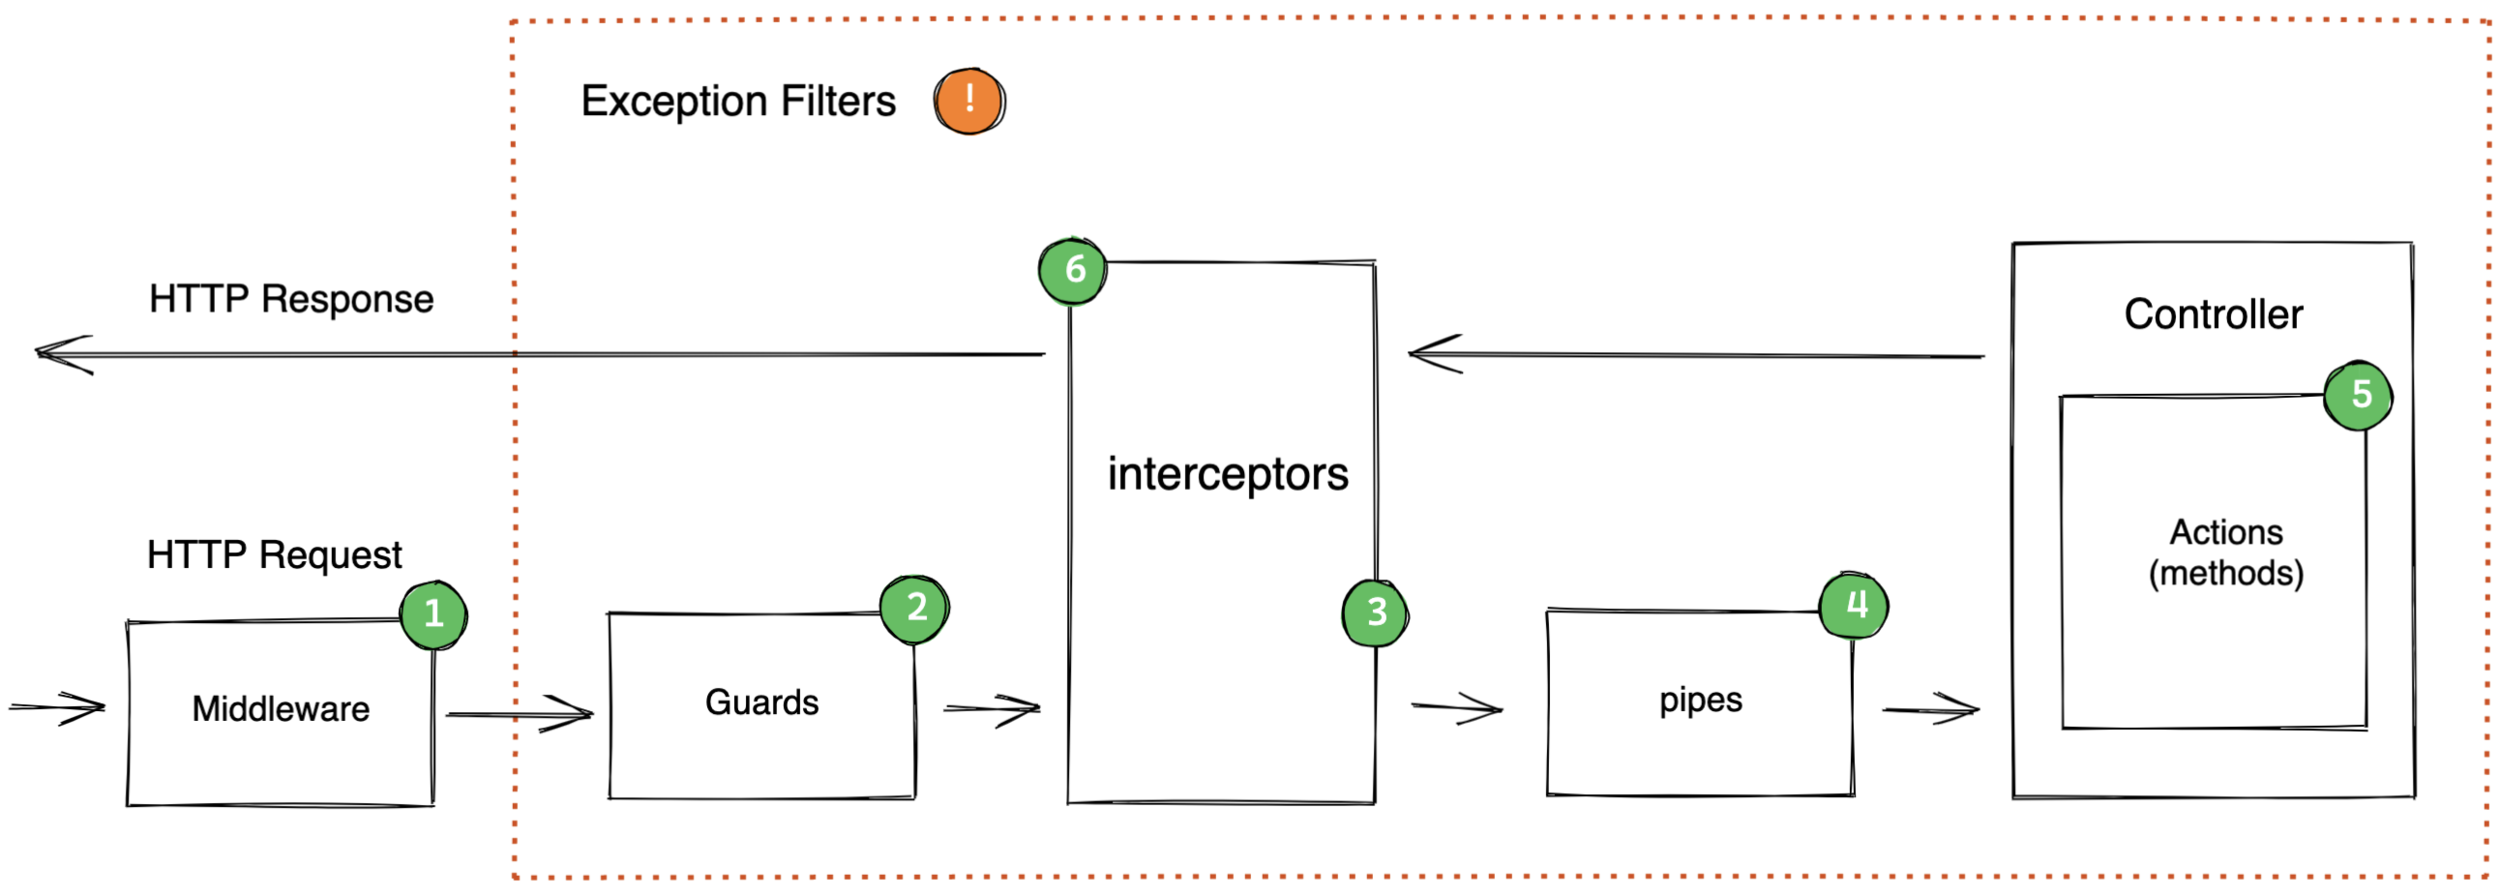
一般来说,一个请求流经中间件、守卫与拦截器,然后到达管道,并最终回到拦截器中的返回路径中(从而产生响应)。
生命周期
一般来说,nest.js 请求生命周期大致如下:
- 收到请求
- 全局绑定的中间件
- 模块绑定的中间件
- 全局守卫
- 控制层守卫
- 路由守卫
- 全局拦截器(控制器之前)
- 控制器层拦截器 (控制器之前)
- 路由拦截器 (控制器之前)
- 全局管道
- 控制器管道
- 路由管道
- 路由参数管道
- 控制器(方法处理器)
- 路由拦截器(请求之后)
- 控制器拦截器 (请求之后)
- 全局拦截器 (请求之后)
- 异常过滤器 (路由,之后是控制器,之后是全局)
- 服务器响应
项目创建
全局命令
pnpm add -g @nestjs/cli nodemon ts-node
nest new project-name
1
2
2
项目依赖
进入项目目录然后安装项目依赖,包含 prisma、表单验证、加密工具、JWT、文件上传、工具包、日期处理等
pnpm add prisma-binding @prisma/client mockjs @nestjs/config class-validator class-transformer argon2 @nestjs/passport passport passport-local @nestjs/jwt passport-jwt lodash multer dayjs express redis @nestjs/throttler

pnpm add -D prisma typescript @types/node @types/mockjs @nestjs/mapped-types @types/passport-local @types/passport-jwt @types/express @types/lodash @types/multer @types/node
1
2
3
2
3
vscode
插件
安装以下插件为 NestJs 提供支持
- Prisma(opens new window)在新窗口打开
- JavaScript and TypeScript Nightly(opens new window)在新窗口打开
- DotENV(opens new window)在新窗口打开
prettierrc
NestJs 项目创建后会生成.prettierrc文件,这是代码格式化规范,下面是向军大叔的配置。
{
  "arrowParens": "always",
  "bracketSameLine": true,
  "bracketSpacing": true,
  "embeddedLanguageFormatting": "auto",
  "htmlWhitespaceSensitivity": "css",
  "insertPragma": false,
  "jsxSingleQuote": false,
  "printWidth": 120,
  "proseWrap": "never",
  "quoteProps": "as-needed",
  "requirePragma": false,
  "semi": false,
  "singleQuote": true,
  "tabWidth": 2,
  "trailingComma": "all",
  "useTabs": false,
  "vueIndentScriptAndStyle": false,
  "singleAttributePerLine": false
}
1
2
3
4
5
6
7
8
9
10
11
12
13
14
15
16
17
18
19
20
2
3
4
5
6
7
8
9
10
11
12
13
14
15
16
17
18
19
20
依赖注入
依赖注入指创建对象的过程由框架自动完成,a 对象在使用 b 对象,b 对象使用 c 对象,a 对象只需要使用 b 对象,而不需要了解 b 对象怎么怎么样创建出 c 对象。
高耦合代码
以下代码是没有依赖注入的情况,a 对象要考虑 b 对象的参数,如果 c 对象也有参数也要考虑,这显然是高耦合低效率的编码体验。
class c {
  run() {
    console.log("c object");
  }
}

class b {
  constructor(private c) {}
  run() {
    this.c.run();
  }
}

class a {
  constructor(private b) {}

  run() {
    this.b.run();
  }
}

const bootstrap = new a(new b(new c()));
bootstrap.run();
1
2
3
4
5
6
7
8
9
10
11
12
13
14
15
16
17
18
19
20
21
22
23
2
3
4
5
6
7
8
9
10
11
12
13
14
15
16
17
18
19
20
21
22
23
依赖注入
NestJs 将类定义在模块的 providers 属性中即声明为提供者,其他类可以在 constructor 构造函数中依赖注入,实现编码的解耦。
下面代码的构造函数使用依赖注入了 PrismaService 与 JwtService 服务实例。
@Injectable()
export class AuthService {
  constructor(private readonly prismaService: PrismaService, private readonly jwtService: JwtService) {}

  async login(loginDto: LoginDto) {
    const user = await this.prismaService.user.findUnique({
      where: {
        name: loginDto.name,
      },
    })

    const passwordCheck = await argon2.verify(user.password, loginDto.password)
    if (!passwordCheck) throw new BadRequestException('密码输入错误!')

    return this.token(user)
  }
  ...
}
1
2
3
4
5
6
7
8
9
10
11
12
13
14
15
16
17
18
2
3
4
5
6
7
8
9
10
11
12
13
14
15
16
17
18