解析器
解析器(parser)负责把字符串模板转化成模板 AST,它的本质就是一个状态机。正则表达式的本质也是一个状态机。
文本模式及其对解析器的影响
✅ 文本模式指的是解析器在工作时所进入的一些特殊状态,如 RCDATA 模式、CDATA 模式、RAWTEXT 模式,以及初始的 DATA 模式等。在不同模式下,解析器对文本的解析行为会有所不同。
文本模式
当解析器遇到一些特殊标签时,会切换模式,从而影响其对文本的解析行为:
<title>标签、<textarea>标签,当解析器遇到这两个标签时,会切换到 RCDATA 模式;<title>、<xmp>、<iframe>、<noembed>、<noframes>、<noscript>等标签,当解析器遇到这些标签时,会切到 RAWTEXT 模式;- 当解析器遇到
<![CDATA[字符串时,会进入 CDATA 模式。
文本解析模式
🌐 HTML parsing tokenization 文档 (opens new window)在新窗口打开
| 模式 | 能否解析标签 | 是否支持 HTML 实体 |
|---|---|---|
| DATA | 能 | 是 |
| RCDATA | 否 | 是 |
| RAWTEXT | 否 | 否 |
| CDATA | 否 |
在默认的 DATA 模式下,解析器在遇到
<时,会切换到标签开始状态(tag open state)。即在该模式下,解析器能够解析标签元素。当解析器遇到字符&时,会切换到字符引用状态(character reference state),也称 HTML 字符实体状态。也就是说,在 DATA 模式下,解析器能够处理 HTML 字符实体。在 RCDATA 模式时,解析器遇到
<标签不会再切换到标签开始状态,而会切换到 RCDATA less-then sign state。在该状态下,解析器遇到字符\会切换到 RCDATA 的结束标签状态,即 RCDATA end tag open state;否则会将当前字符<作为普通字符处理,然后继续处理其他字符。由此可知,在 RCDATA 状态下,解析器不能识别标签元素。这其实间接说明了在
<textarea>内可以将字符<作为普通文本,解析器不会认为字符<是标签开始的标志。<!-- textarea 内部的标签将作为普通文本 --> <textarea> <div>abc</div>hello </textarea> <!-- textarea 能解析 HTML 实体 --> <textarea>©</textarea>1
2
3
4
5
6
7在 RAWTEXT 模式下的工作方式与在 RCDATA 模式下类似。唯一不同的是,在 RAWTEXT 模式下,解析器将不再支持 HTML 实体。
对于 Vue.js 的模板 DSL 来说,模板中不允许出
<script>标签,因此 Vue.js 模板解析器在遇到<script>标签时会进入 RAWTEXT 模式,这时它会把<script>标签内的内容全部作为普通文本处理。
不同的模式还会影响解析器对于终止解析的判断。WHATWG 中还定义了 PLAINTEXT 模式,该模式与 RAWTEXT 类似。不同的是,该模式一旦进入便不会再退出。Vue.js 的模板解析用不到该模式。
const TextMode = {
  DATA: 'DATA',
  RCDARA: 'RCDATA',
  RAWDATA: 'RAWDATA',
  CDATA: 'CDATA'
}
2
3
4
5
6
递归下降算法构造模板 AST
子节点类型
之前的模板 AST 的构建思路是先进行词法记号的分割,然后创建模板 AST。
// 定义文本模式,作为一个状态表
const TextModes = {
  DATA: 'DATA',
  RCDATA: 'RCDATA',
  RAWTEXT: 'RAWTEXT',
  CDATA: 'CDATA'
}

// 解析器函数,接收模板作为参数,负责模板 AST 的创建
function parse(str) {
  // 定义上下文对象
  const context = {
    // source 模板内容,用于解析过程消费
    source: str,
    // 解析器当前的文本模式
    mode: TextModes.DATA,
  }

  // parseChidren 函数解析,返回解析后得到的子节点
  // context: 上下文对象
  // Node[]: 父节点构成的节点栈,初始为空
  const nodes = parseChildren(context, [])

  return {
    type: 'Root',
    // 使用 nodes 作为根节点的 children
    children: nodes
  }
}
2
3
4
5
6
7
8
9
10
11
12
13
14
15
16
17
18
19
20
21
22
23
24
25
26
27
28
29
✅ 创建 Token 与构造模板 AST 的过程可以同时进行,因为模板和模板 AST 具有同构的特性。
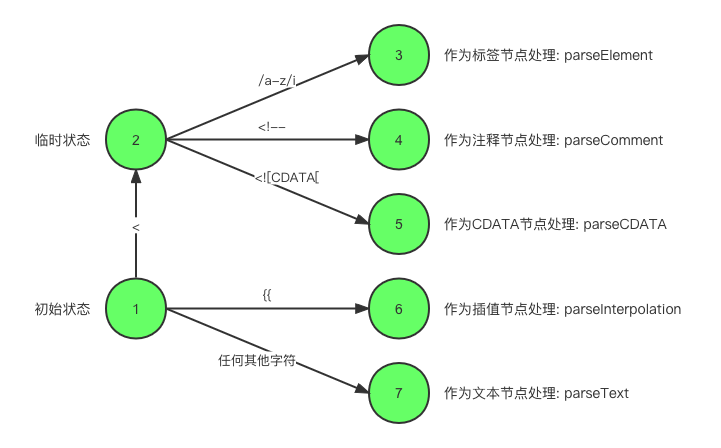
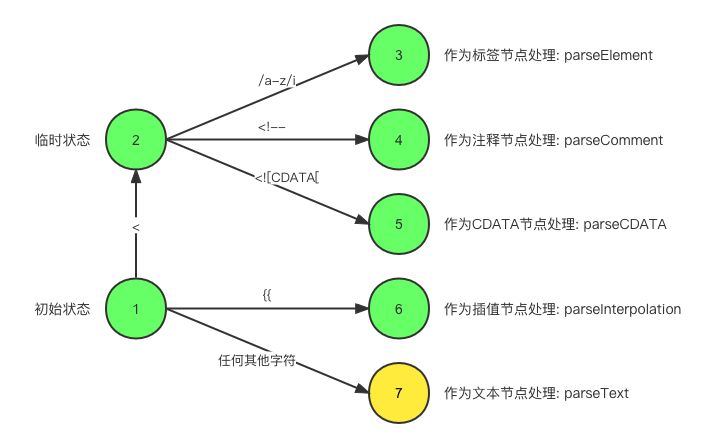
parseChidren函数本质上也是一个状态机,该状态机有多少种状态取决于子节点的类型数量。
在模板中,元素的子节点可以是一下几种:
- 标签节点,例如
<div> - 文本插值节点,例如
- 普通文本节点,例如:
text - 注释节点,例如
<!----> - CDATA 节点,例如
<![CDATA[ xxx ]]>
在标准的 HTML 中,节点的类型将会更多,例如 DOCTYPE 节点等。
parseChildren
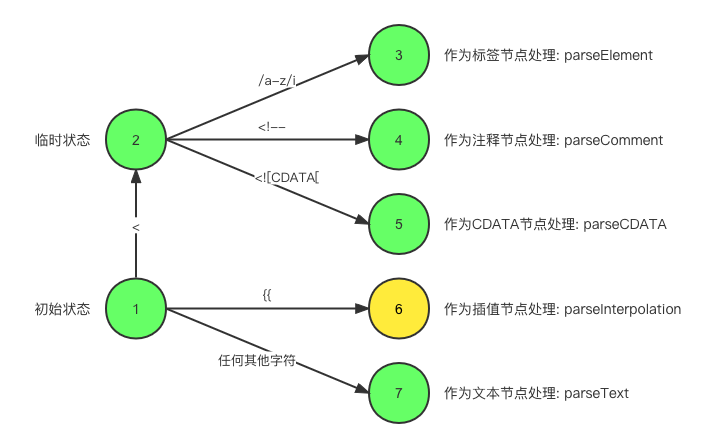
下图为 parseChildren 函数在解析模板过程中的状态迁移过程。
function parseChildren(context, ancestors) {
  // nodes 存储子节点,作为返回值
  let nodes = []
	// 从上下文对象取得当前状态,模式 mode 与模板内容 source
  const { mode, source } = context
	// 解析字符串,遇到父级节点的结束标签可停止解析
  while(!isEnd(context, ancestors)) {
    let node
		// DATA 和 RCDATA 模式支持插值节点的解析
    if (mode === TextModes.DATA || mode === TextModes.RCDATA) {
      // 只有 DATA 模式才支持标签节点的解析
      if (mode === TextModes.DATA && context.source[0] === '<') {
        if (context.source[1] === '!') {
          if (context.source.startsWith('<!--')) {
            // 注释
            node = parseComment(context)
          } else if (context.source.startsWith('<![CDATA[')) {
            // CDATA
            node = parseCDATA(context, ancestors)
          }
        } else if (context.source[1] === '/') {
          // 结束标签,这里要抛出错误
        } else if (/[a-z]/i.test(context.source[1])) {
          // 标签
          node = parseElement(context, ancestors)
        }
      } else if (context.source.startsWith('{{')) {
        // 解析插值
        node = parseInterpolation(context)
      }
    }

		// node 不存在,说明出于其他模式,非 DATA、RCDATA
    // 这时一切内容都作为文本处理
    if (!node) {
      node = parseText(context)
    }
		// 将节点添加到数组中
    nodes.push(node)
  }

  return nodes
}
2
3
4
5
6
7
8
9
10
11
12
13
14
15
16
17
18
19
20
21
22
23
24
25
26
27
28
29
30
31
32
33
34
35
36
37
38
39
40
41
42
43
parseChildren函数的返回值是子节点组成的数组,这里每次 while 循环都会解析一个或多个节点,这些节点会被添加到 node 数组中,并作为函数返回值。- 只有 DATA 和 RCDATA 模式支持插值节点的解析;只有 DATA 模式才支持标签节点、注释节点和 CDATA 节点的解析。
- 解析器在遇到特定标签时,会切换模式。一旦解析器切换到 DATA模式和 RCDATA 模式之外的模式时,一切内容都会作为文本节点被解析。当然,即使在 DATA 模式和 RCDATA 模式下,如果无法匹配标签节点、注释节点、CDATA 节点、插值节点,那么也会作为文本节点解析。
const template = `<div>
	<p>Text1</p>
	<p>Text2</p>
</div>`
2
3
4
解析模板时,不能忽略空白字符。这些空白字符包括:换行符(\n)、回车符(\t)、空格(' ')、制表符(\t)以及换页符(\f)。
如果我们用(+)代表换行符,用(-)代表空格字符,那么模板可以表示为:
const template = `<div>+--<p>Text1</p>+--<p>Text1</p>+</div>`
解析器—开始处于 DATA 模式。开始执行解析后,解析器遇到的第一个字符为<,并且第个字符能够匹配正则表达式 /a-z/t,所以解析器会进人标签节点状态,并调用 parseElement函数进行解析。
function parseElement(context, ancestors) {
  // 解析开始标签
  const element = parseTag(context)
  // 递归调用 parseChildren 解析子节点
  element.children = parseChildren(context, ancestors)
  // 解析结束标签
  parseEndTag()

  return element
}
2
3
4
5
6
7
8
9
10
parseElement 函数会做三件事:
- 解析开始标签
- 解析子节点
- 解析结束标签
解析过程
解析过程
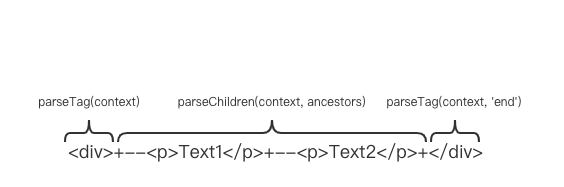
如果一个标签不是自闭合标签,则可以认为,一个完整的标签元素是由开始标签、子节点和结束标签这三部分构成的。因此,在 parseElement 函数内,我们分别调用三个解析函数来处理这三部分内容。以上述模板为例。
parseTag解析开始标签。parseTag函数用于解析开始标签,包括开始标签上的属性和指令。因此,在parseTag解析函数执行完毕后,会消费字符串中的内容<div>,处理后的模板内容将变为:
const template =`+--<p>Text1</p>+--<p>Text2</p>+</div>`
递归地调用
parseChildren函数解析子 节点。parseElement函数在解析开始标签时,会产生一个标签节点 element。在parseElement函数执行完毕后,剩下的模板内容应该作为element 的子节点被解析,即element.children。因此,我们要递归地调用parseChildren函数。在这个过程中,parsechildren函数会消费字符串的内容:+--<p>Text1</p>+--<p>Text2</p>+。处理后的模板内容将变为:const template =`</div>`1parseEndTag处理结束标签。可以看到,在经过parseChildren函数处理后,模板内容只剩下一个结束标签了。因此,只需要调用parseEndTag解析西数来消费它即可。
经过上述三个步骤的处理后,这段模板就被解析完毕了,最终得到了模板 AST。但这里值得注意的是,为了解析标签的子节点,递归地调用了 parseChildren 函数。这意味着,一个新的状态机开始运行了,我们称其为“状态机 2”。“状态机 2”所处理的模板内容为:
const template = `+--<p>Text1</p>+--<p>Text2</p>+`
接下来,我们继续分析〝状态机 2” 的状态迁移流程。在“状态机 2〞开始运行时,模板的第一个字符是换行符(字符+代表换行符)。因此,解析器会进入文本节点状态,并调用 parseText函数完成文本节点的解析。parseText 函数会将下一个<字符之前的所有字符都视作文本节点的内容。换向话说,parseText 函数会消费模板内容+--,并产生一个文本节点。在parseText 解析函数执行完毕后,剩下的模板内容为:
const template = `<p>Text1</p>+--<p>Text2</p>+`
接着,parseChildren 函数继续执行。此时模板的第一个字符为<,并且下一个字符能够匹配正则 /a-z/i。于是解析器再次进人 parseElement 解析函数的执行阶段,这会消费模板内容<p>Text1</p>。在这一步过后,剩下的模板内容为:
const template =`+--<p>Text2</p>+`
可以看到,此时模板的第一个字符是换行符,于是调用 parseText 函数消费模板内容+--现在,模板中剩下的内容是:
const template =`<p>Text2</p>+`
解析器会再次调用 parseElement 丽数处理标签节点。在这之后,剩下的模板内容为:
const template =`+`
可以看到,现在模板内容只剩下一个换行符了。parseChildren 函数会继续执行并调用parseText 函数消费剩下的内容,并产生一个文本节点。最终,模板被解析完毕,“状态机2”停止运行。
在“状态机2”运行期间,为了处理标签节点,我们又调用了两次 parseElement 函数。第一次调用用于处理内容 <p>Text1</p>,第二次调用用于处理内容 <p>Text2</p>。我们知道parseElement 函数会递少地调用 parsechildren 函数完成子节点的解析,这就意味着解析器会再开启了两个新的状态机。
递归与下降
✅ parseChildren解析函数是整个状态机的核心,状态迁移操作都在该函数内完成。在parseChildren 函数运行过程中,为了处理标签节点,会调用parseElement 解析函数,这会间接地调用 parseChildren函数,并产生一个新的状态机。
递归:随着标签嵌套层次的增加,新的状态机会随着parseChildren函数递归地调用而不断创建,这就是“递归下降”中“递归”二字的含义。
下降:而上级parseChildren函数的调用用于构造上级模板 AST,被递归调用的下级 parseChildren 函数则用于构造下级模板 AST 节点。最终,会构造出一棵树型结构的模板 AST,这就是“递归下降”中“下降”二字的含义。
状态机的开启和停止
✅ 概览
在解析模板 AST的过程中,parseChildren是核心。每次调用都意味着新状态机的开启。状态机的结束时机有两个:
- 第一个停止时机是当模板内容被解析完毕时。
- 第二个停止时机是遇到结束标签时,这时解析器会取得父级节点栈栈顶的节点作为父节点,检查该节点结束标签是否与父节点的标签同名,如果相同,则状态机停止运行。
parseChildren函数本质上是一个状态机,它会开启一个 while 循环使得状态机自动运行。
function parseChildren(context, ancestors) {
  let nodes = []

  const { mode } = context
  // 运行状态机
  while(!isEnd(context, ancestors)) {
    // 省略部分代码
  }

  return nodes
}
2
3
4
5
6
7
8
9
10
11
isEnd.v1
当解析器遇到开始标签时,会将该标签压入父级节点栈,同时开启新的状态机。当解析器遇到结束标签,井且父级节点栈中存在与该标签同名的开始标签节点时,会停止当前正在运行的状态机。根据上述规则,我们可以给出isEnd函数的逻辑,如下面的代码所示:
function isEnd(context, ancestors) {
  // 当解析内容解析完毕之后,停止
  if (!context.source) return true
  const parent = ancestors[ancestors.length - 1]
  // 遇到与父节点同名的结束标签时,停止
  if (parent && context.source.startsWith(`</${parent.tag}`)) {
    return true
  }
}
2
3
4
5
6
7
8
9
这个判断方式是有瑕疵的,以下面这个模板为例:
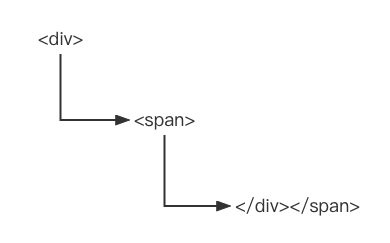
<div><span></div></span>
- 目前代码“状态机1“会遇到 div 会开启一个“状态机2“
- 接着遇到 span 再开启一个“状态机3“
- “状态机3“解析时遇到了
</div>这个结束标签,与当前 span 标签不符。则“状态机3“抛出错误:“无效的结束标签”
function parseChildren(context, ancestors) {
  let nodes = []
  const { mode } = context

  while(!isEnd(context, ancestors)) {
    let node

    if (mode === TextModes.DATA || mode === TextModes.RCDATA) {
      if (mode === TextModes.DATA && context.source[0] === '<') {
        if (context.source[1] === '!') {
          if (context.source.startsWith('<!--')) {
            // 注释
          } else if (context.source.startsWith('<![CDATA[')) {
            // CDATA
          }
        } else if (context.source[1] === '/') {
          // 结束标签,这里要抛出错误,因为它缺少对应的开始标签
          console.error('无效的结束标签')
          continue
        } else if (/[a-z]/i.test(context.source[1])) {
          // ...
        }
      } else if (context.source.startsWith('{{')) {
        // ...
      }
    }
    // ...
  }

  return nodes
}
2
3
4
5
6
7
8
9
10
11
12
13
14
15
16
17
18
19
20
21
22
23
24
25
26
27
28
29
30
31
当前解释方式是会得到错误信息:“无效的结束标签”。
isEnd.v2
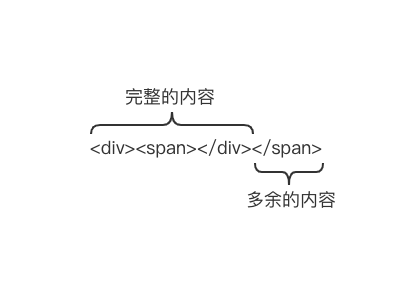
✅ 还有一种解释方式,在“完整的内容”部分被解析完毕后,解析器就会打印错误信息:“<span>标签缺少闭合标签”。
function isEnd(context, ancestors) {
  if (!context.source) return true

  // 与节点栈内全部的节点比较
  for (let i = ancestors.length - 1; i >= 0; --i) {
    if (context.source.startsWith(`</${ancestors[i].tag}`)) {
      return true
    }
  }
}
2
3
4
5
6
7
8
9
10
- ”状态机1”遇到 div 会开启一个”状态机2”;
- 接着遇到 span 再开启一个”状态机3”;
- ”状态机3”这个状态机解析时遇到了
</div>这个结束标签,在节点栈中找到了存在名为 div 的标签节点。于是状态机3停止。
在这个过程中,“状态机2”在调用parseElement函数时检测到<span>缺少闭合标签,打印“<span>缺少闭合标签”。
function parseElement(context, ancestors) {
  const element = parseTag(context)
  if (element.isSelfClosing) return element

  ancestors.push(element)
  element.children = parseChildren(context, ancestors)
  ancestors.pop()

  if (context.source.startsWith(`</${element.tag}`)) {
    parseTag(context, 'end')
  } else {
    console.error(`${element.tag} 标签缺少闭合标签`)
  }

  return element
}
2
3
4
5
6
7
8
9
10
11
12
13
14
15
16
解析标签节点
在上面给出的parseElement函数的实现中,无论是解析开始标签还是闭合标签,都调用了parseTag函数。同时,使用parseChildren函数来解析开始标签与闭合标签中间的部分。
parseTag函数通过第二个参数区分当前解析的是开始标签还是闭合标签。另外,无论是处理的是哪个标签,该函数都会消费对应的内容。
function parse(str) {
  // 上下文对象
  const context = {
    // 模板内容
    source: str,
    mode: TextModes.DATA,
    // 消费指定数量的字符
    advanceBy(num) {
      context.source = context.source.slice(num)
    },
    // 消费空白字符
    advanceSpaces() {
      const match = /^[\t\r\n\f ]+/.exec(context.source)
      if (match) {
        context.advanceBy(match[0].length)
      }
    }
  }

  const nodes = parseChildren(context, [])

  return {
    type: 'Root',
    children: nodes
  }
}
2
3
4
5
6
7
8
9
10
11
12
13
14
15
16
17
18
19
20
21
22
23
24
25
26
正则测试:
/^[\t\r\n\f ]+/.exec(`   <div>`)
// ['   ', index: 0, input: '   <div>', groups: undefined]
2
function parseTag(context, type = 'start') {
  const { advanceBy, advanceSpaces } = context

  const match = type === 'start'
  	// 匹配开始标签
    ? /^<([a-z][^\t\r\n\f />]*)/i.exec(context.source)
  	// 匹配结束标签
    : /^<\/([a-z][^\t\r\n\f />]*)/i.exec(context.source)

  // 获取匹配的标签名称
  const tag = match[1]
	// 消费正则匹配的全部内容 '<div'  '</div'
  advanceBy(match[0].length)
  // 消费标签中无用的空白字符
  advanceSpaces()

  const props = parseAttributes(context)
	// 消费完匹配内容,判断当标签是不是自闭合标签
  const isSelfClosing = context.source.startsWith('/>')
  // 消费标签全部内容
  advanceBy(isSelfClosing ? 2 : 1)

  return {
    type: 'Element',
    tag,  // 标签名
    props,
    children: [],
    isSelfClosing  // 是不是自闭合标签
  }
}
2
3
4
5
6
7
8
9
10
11
12
13
14
15
16
17
18
19
20
21
22
23
24
25
26
27
28
29
30
正则测试:
/^<([a-z][^\t\r\n\f />]*)/i.exec(`<div>hello</div>`)
// ['<div', 'div', index: 0, input: '<div>hello</div>', groups: undefined]

/^<([a-z][^\t\r\n\f />]*)/i.exec(`<div  >hello</div>`)
// ['<div', 'div', index: 0, input: '<div  >hello</div>', groups: undefined]

/^<\/([a-z][^\t\r\n\f />]*)/i.exec(`</p><p></p>`)
// ['</p', 'p', index: 0, input: '</p><p></p>', groups: undefined]
2
3
4
5
6
7
8
[^\t\r\n\f />]匹配非空白符,非字符 / 和字符 >
parseTag函数既用于解析开始标签,也用于解析结束标签- 通过正则匹配当前标签是开始标签还是结束标签
function parseElement(context, ancestors) {
  const element = parseTag(context)
  if (element.isSelfClosing) return element

  ancestors.push(element)
  // 切换到正确的文本模式
  if (element.tag === 'textarea' || element.tag === 'title') {
    context.mode = TextModes.RCDATA
  } else if (/style|xmp|iframe|noembed|noframes|noscript/.test(element.tag)) {
    context.mode = TextModes.RAWTEXT
  } else {
    context.mode = TextModes.DATA
  }
  element.children = parseChildren(context, ancestors)
  ancestors.pop()
s
  if (context.source.startsWith(`</${element.tag}`)) {
    parseTag(context, 'end')
  } else {
    console.error(`${element.tag} 标签缺少闭合标签`)
  }

  return element
}
2
3
4
5
6
7
8
9
10
11
12
13
14
15
16
17
18
19
20
21
22
23
24
经过parseTag的处理之后,会返回一个标签节点。parseElement函数在得到由parseTag函数产生的标签节点后,需要根据节点的类型完成文本模式的切换。
解析属性
parseTag解析函数会消费整个开始标签,这意味着同时它还要能够处理开始标签存在的属性与指令。
<div id="foo" v-show="display" />
属性值的三种情况
- 属性值被双引号包裹:
id="doo" - 属性值被单引号包裹:
id='doo' - 属性值没有引号包裹:
id=doo
function parseTag(context, type = 'start') {
  const { advanceBy, advanceSpaces } = context

  const match = type === 'start'
    ? /^<([a-z][^\t\r\n\f />]*)/i.exec(context.source)
    : /^<\/([a-z][^\t\r\n\f />]*)/i.exec(context.source)

  const tag = match[1]
	// 消费正则匹配的全部内容 '<div'  '</div'
  advanceBy(match[0].length)
  // 消费标签中无用的空白字符
  advanceSpaces()
	// 解析属性和指令
  const props = parseAttributes(context)
	// 消费完匹配内容,判断当标签是不是自闭合标签
  const isSelfClosing = context.source.startsWith('/>')
  // 消费标签全部内容
  advanceBy(isSelfClosing ? 2 : 1)

  return {
    type: 'Element',
    tag,  // 标签名
    props,
    children: [],
    isSelfClosing  // 是不是自闭合标签
  }
}
2
3
4
5
6
7
8
9
10
11
12
13
14
15
16
17
18
19
20
21
22
23
24
25
26
27
我们需要在消费标签的“开始部分”和无用空白字符之后,再调用parseAttributes函数。
// ...
const tag = match[1]
advanceBy(match[0].length)
advanceSpaces()

console.log(context.source)  // id="foo" v-show="display" />

parseAttributes(context)
2
3
4
5
6
7
8
function parseAttributes(context) {
  const { advanceBy, advanceSpaces } = context
  const props = []

  // 循环不断消费模板内容,直至遇到标签的“结束部分”为止
  while (
    !context.source.startsWith('>') &&
    !context.source.startsWith('/>')
  ) {
		// 匹配属性名称
    const match = /^[^\t\r\n\f />][^\t\r\n\f />=]*/.exec(context.source)
    const name = match[0]

    advanceBy(name.length)  // 属性名
    advanceSpaces()  // 属性名与等于号之间的空白字符
    advanceBy(1)  // 等于号
    advanceSpaces()  // 等于号与属性值之间的空白符

    let value = ''  // 属性值

    const quote = context.source[0]
    const isQuoted = quote === '"' || quote === "'"
    if (isQuoted) {
      // 属性值被引号包裹,消费引号
      advanceBy(1)
      const endQuoteIndex = context.source.indexOf(quote)
      if (endQuoteIndex > -1) {
        // 获取属性值并消费
        value = context.source.slice(0, endQuoteIndex)
        advanceBy(value.length)
        advanceBy(1)  // 消费引号
      } else {
        console.error('缺少引号')
      }
    } else {
      // 属性值未被引号包裹
      // 下一个空白字符之前的内容全部作为属性值
      const match = /^[^\t\r\n\f >]+/.exec(context.source)
      value = match[0]
      advanceBy(value.length)
    }

    advanceSpaces()  // 消费属性值后面的空白字符

    props.push({
      type: 'Attribute',
      name,
      value
    })

  }

  return props
}
2
3
4
5
6
7
8
9
10
11
12
13
14
15
16
17
18
19
20
21
22
23
24
25
26
27
28
29
30
31
32
33
34
35
36
37
38
39
40
41
42
43
44
45
46
47
48
49
50
51
52
53
54
parseAttributes函数消费模板内容的过程,就是不断地解析属性名称、等于号、属性值的过程。
// 属性名称匹配
/^[^\t\r\n\f />][^\t\r\n\f />=]*/.exec(`id="123"`)
// ['id', index: 0, input: 'id="123"', groups: undefined]

// 没有引号包裹的属性值匹配1
/^[^\t\r\n\f >]+/.exec(`val name='jhon'`)
// ['val', index: 0, input: "val name='jhon'", groups: undefined]
2
3
4
5
6
7
//  <div
//    id="foo"
//    v-show="display"
//    @click=""handler"
//    v-on:mousedown="onMouseDown">
//  </div>
const ast = {
  type: 'Root',
  chidlren: [
    {
      type: 'Element',
      tag: 'div',
      props: [
        { type: 'Attribute', name: 'id', value: 'foo' },
        { type: 'Attribute', name: 'v-show', value: 'display' },
        { type: 'Attribute', name: '@click', value: 'handler' },
        { type: 'Attribute', name: 'v-on:mousedown', value: 'onMouseDown' },
      ]
    }
  ]
}
2
3
4
5
6
7
8
9
10
11
12
13
14
15
16
17
18
19
20
21
我们可以灵活地解析出属性的类型,比如指令可以指定
type = Directive
解析文本与解析 HTML 实体
✅ 概览
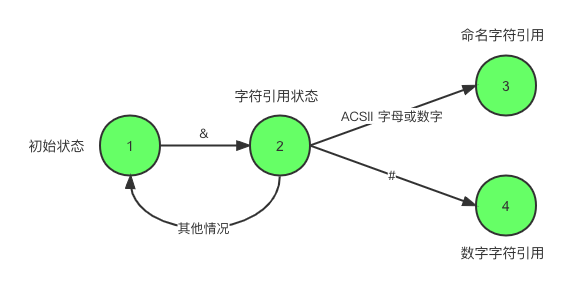
解析文本节点并不复杂,它的复杂点在于,我们需要对解析后的文本内容进行 HTML 实体的解码工作。WHATWG 规范中也定义了解码 HTML 实体过程中的状态迁移过程。HTML 实体类型有两种,分别是命名字符引用和数字字符引用。命名字符引用的解码方式可以总结为两种。
- 当存在分号时:执行完整匹配。
- 当省略分号时:执行最短匹配。
对于数字字符引用,则按照 WHATWG 规范中定义的规则逐步实现。
解析文本
当解析下面这个模板时:
const template = '<div>Text</div>'
// parseTag '<div>'
const templaye = 'Text</div>'
2
3
紧接着,解析器会调用parseChildren开启一个新的状态机来处理这段模板。状态机的迁移过程如下:
解析器会在模板中寻找下一个<字符或插值定界符的位置索引,记为索引 I 。然后,解析器会从模板头部到索引 I 的位置截取内容,这段截取出来的字符串将作为文本节点的内容。
const template = 'Text</div>'  // Text  <
const template1 = 'Text-{{ val }}</div>'  // Text-  {{
2
function parseText(context) {
  // endIndex 为文本内容的结尾索引,默认为整个模板剩余内容
  let endIndex = context.source.length
  const ltIndex = context.source.indexOf('<')
  const delimiterIndex = context.source.indexOf('{{')

  // 取 ItIndex 和当前 endIndex 中较小的一个作为新的结尾索引
  if (ltIndex > -1 && ltIndex < endIndex) {
    endIndex = ltIndex
  }
  // 取 delimiterIndex 和当前 endIndex 中较小的一个作为新的结尾索引
  if (delimiterIndex > -1 && delimiterIndex < endIndex) {
    endIndex = delimiterIndex
  }
  // 截取文本内容
  const content = context.source.slice(0, endIndex)
	// 消费文本
  context.advanceBy(content.length)

  return {
    type: 'Text',
    content: decodeHtml(content)
  }
}
2
3
4
5
6
7
8
9
10
11
12
13
14
15
16
17
18
19
20
21
22
23
24
// const ast = parse(`<div>Text</div>`)

const ast = {
  type: 'Root',
  chidlren: [
    {
      type: 'Element',
      tag: 'div',
      props: [],
      isSelfClosing: false,
      children: [
        // 文本节点
        { type: 'Text', content: 'Text' }
      ]
    }
  ]
}
2
3
4
5
6
7
8
9
10
11
12
13
14
15
16
17
文本节点的解析并不复杂,复杂点在于,我们需要对解析后的文本进行 HTML 实体的解码工作。
解码命名字符的引用
HTML 实体
HTML 实体是一段以字符&开始的文本内容。实体用来描述 HTML 中的保留字符和一些难以通过普通键盘输人的字符,以及一些不可见的宇符。例如,在 HTML 中,字符<具有特殊含义,如果希望以普通文本的方式来显示宇符<,需要通过实体来表达:
<div>A<B</div>
其中字符串 &1t;就是一个 HTML 实体,用来表示字符<。如果我们不用 HTML 实体,而是直接使用字符<,那么将会产生非法的 HTML 内容:
<div>A<B</div>
⚡️ 这会导致浏览器的解析结果不符合预期。
HTML 实体总是以字符 & 开头,以字符 ; 结尾。在web诞生的初期,HTML 实体的数量较少,因此允许省略其中的尾分号。但随着 HTML 宇符集越来越大,HTML 实体出现了包含的情况,例如
<和<cc都是合法的实体,如果不加分号,测览器将无法区分它们。因此,WHATWG规范中明确规定,如果不为实体加分号,将会产生解析错误。但考虑到历史原因(互联网上存在大量省略分号的情況),现代浏览器都能够解析早期规范中定义的那些可以省略分号的 HTML 实体。
HTML 实体
命名字符引用(named character reference),也叫命名实体(named entity)。顾名思义,这类实体具有特定的名称,例如
$lt;。数字字符引用(numeric character reference)。它们没有特定的名称,只能用数字表示。
与命名字符引用用不同,数字字符引用以宇符
&#开头,比命名字符引用的开头部分多出了字符 #,例如<。实际上,<对应的字符也是 <,换句话说,&#60;与<是等价的。数字字符引用既可以用十进制来表示,也可以使用十六进制来表示。例如,十进制数字 60 对应的十六进制值为 3C,因此实体<也可以表示为<。可以看到,当使用十六进制数表示实体时,需要以字符串&#x开头。
为什么 Vue.js 模板的解析器要对文本节点中的 HTML 实体进行解码?
在 Vue.js 模板中,文本节点所包含的 HTML 实体不会被浏览器解析。这是因为模板中的文本节点最终将通过如 el.textcontent等操作方法设置到页面,而通过el.textContent设置的文本内容是不会经过 HTML 实体解码的。
el.textContent = '<'
✅ 最终 el 的文本内容将会原封不动地呈现为字符串'<',这意味着用户在 Vue.js 模板中写了 HTML 实体,而模板解析器渲染的内容不符合用户预期。所以我们需要在解析阶段对文本节点中存在的 HTML 实体进行解码。
const namedCharacterReferences = {
  "gt": ">",
  "gt;": ">",
  "lt": "<",
  "lt;": "<",
  "ltcc;": "⪦"
}
2
3
4
5
6
7
以上是一个部分命名字符引用表,相同的字符对应的实体会有多个,既有带分号的,也有不带分号的。而有一些则只有带分号的版本,因为这些实体不允许省略分号。
- 当存在分号时:执行完整匹配
- 当省略分号时:执行最短匹配
function decodeHtml(rawText, asAttr = false) {
let offset = 0
const end = rawText.length
let decodedText = '' // 解码后的返回值
let maxCRNameLength = 0
function advance(length) {
offset += length
rawText = rawText.slice(length)
}
// 消费字符串,直到处理完为止
while (offset < end) {
const head = /&(?:#x?)?/i.exec(rawText)
// 没有匹配到内容,说明没有需要解码的内容,直接消费
if (!head) {
const remaining = end - offset
decodedText += rawText.slice(0, remaining)
advance(remaining)
break
}
// 消费 & 字符之前的普通文本
decodedText += rawText.slice(0, head.index)
advance(head.index)
if (head[0] === '&') {
// 命名字符引用,否则为数字字符引用
let name = ''
let value
// 字符 & 的下一个字符必须是 ASCII 字母或数字,这才是合法的命名字符引用
if (/[0-9a-z]/i.test(rawText[1])) {
// 根据引用表计算实体名称的最大长度
if (!maxCRNameLength) {
maxCRNameLength = Object.keys(namedCharacterReferences).reduce(
(max, name) => Math.max(max, name.length),
0
)
}
// 从最大长度进行尝试截取匹配
for (let length = maxCRNameLength; !value && length > 0; --length) {
name = rawText.substr(1, length)
value = (namedCharacterReferences)[name]
}
// 找到对应项的值,匹配成功
if (value) {
// 检查实体名称的最后一个字符是不是分号
const semi = name.endsWith(';')
// 如果解码的文本作为属性值,最后一个匹配字符不是分号
// 并且最后一个匹配字符的下一个字符是等于号(=)、ASCII 字母或数字
// 由于历史原因,将字符 & 和实体名称 name 作为普通文本 href="foo.com?a=1<=2"
if (
asAttr &&
!semi &&
/[=a-z0-9]/i.test(rawText[name.length + 1] || '')
) {
decodedText += '&' + name
advance(1 + name.length)
} else {
// 其他情况下,使用解码后的内容拼接到 decodedText 上
decodedText += value
advance(1 + name.length)
}
} else {
decodedText += '&' + name
advance(1 + name.length)
}
} else {
// 如果没找到对应字符,说明解码失败
decodedText += '&'
advance(1)
}
}
}
return decodedText
}
2
3
4
5
6
7
8
9
10
11
12
13
14
15
16
17
18
19
20
21
22
23
24
25
26
27
28
29
30
31
32
33
34
35
36
37
38
39
40
41
42
43
44
45
46
47
48
49
50
51
52
53
54
55
56
57
58
59
60
61
62
63
64
65
66
67
68
69
70
71
72
73
74
正则测试:
/&(?:#x?)?/i.exec(`hello <`)
// ['&', index: 6, input: 'hello <', groups: undefined]
2
function parseText(context) {
  // endIndex 为文本内容的结尾索引,默认为整个模板剩余内容
  let endIndex = context.source.length
  const ltIndex = context.source.indexOf('<')
  const delimiterIndex = context.source.indexOf('{{')

  // 取 ItIndex 和当前 endIndex 中较小的一个作为新的结尾索引
  if (ltIndex > -1 && ltIndex < endIndex) {
    endIndex = ltIndex
  }
  // 取 delimiterIndex 和当前 endIndex 中较小的一个作为新的结尾索引
  if (delimiterIndex > -1 && delimiterIndex < endIndex) {
    endIndex = delimiterIndex
  }
  // 截取文本内容
  const content = context.source.slice(0, endIndex)
	// 消费文本
  context.advanceBy(content.length)

  return {
    type: 'Text',
    content: decodeHtml(content)
  }
}
2
3
4
5
6
7
8
9
10
11
12
13
14
15
16
17
18
19
20
21
22
23
24
解码数字字符
上面代码使用一个正则表达式来匹配一个文本中字符引用的开始部分:
const head = /&(?:#x?)?/i.exec(rawText)
我们可以根据正则匹配结果来判断字符引用的类型:
- 如果
head[0] === '&',则说明匹配的是命名字符引用。 - 如果
head[0] === '&#',则说明匹配的是以十进制表示的数字字符引用。 - 如果
head[0] === '&#x',则说明匹配的是以十六进制表示的数字字符引用。
// 判断是十进制表示还是十六进制表示
const hex = head[0] === '&#x'
// 根据不同进制表示法,选用不同的正则
const pattern = hex ? /^&#x([0-9a-f]+);?/i : /^&#([0-9]+);?/
// 最终,body[1] 的值就是 Unicode 码点
const body = pattern.exec(rawText)
2
3
4
5
6
✅ 数字字符引用的格式是:前缀 + Unicode码点。解码数字字符引用的关键在于,如何提取字符引用中的 Unicode 码点。考虑到数字字符引用的前缀可以是以十进制表示(&#),也可以是以十六进制表示(&#x),所以我们使用下面的代码来完成码点的提取。
if (body) {
  // 将码点字符串转为十进制数字
  const cp = Number.parseInt(body[1], hex ? 16 : 10)
  // 解码
  const char = String.fromCodePoint(cp)
  }
}
2
3
4
5
6
7
有了 Unicode 码点之后,只需要调用String.fromCodePoint函数即可将其解码为对应的字符。
function decodeHtml(rawText, asAttr = false) {
  let offset = 0
  const end = rawText.length
  let decodedText = ''
  let maxCRNameLength = 0

  function advance(length) {
    offset += length
    rawText = rawText.slice(length)
  }

  while (offset < end) {
    const head = /&(?:#x?)?/i.exec(rawText)
    if (!head) {
      const remaining = end - offset
      decodedText += rawText.slice(0, remaining)
      advance(remaining)
      break
    }
    // Advance to the "&".
    decodedText += rawText.slice(0, head.index)
    advance(head.index)

    if (head[0] === '&') {
      // Named character reference...

    } else {
      const hex = head[0] === '&#x'
      const pattern = hex ? /^&#x([0-9a-f]+);?/i : /^&#([0-9]+);?/
      const body = pattern.exec(rawText)

      // 如果匹配成功,则调用 String.fromCodePoint 函数进行解码
      if (body) {
        // 将码点字符串转为十进制数字
        const cp = Number.parseInt(body[1], hex ? 16 : 10)
        // 码点的合法性检查
        if (cp === 0) {
          // 如果码点值为 0x00,替换为 0xfffd
          cp = 0xfffd
        } else if (cp > 0x10ffff) {
          // 如果码点值超过了 Unicode 的最大值,替换为 0xfffd
          cp = 0xfffd
        } else if (cp >= 0xd800 && cp <= 0xdfff) {
          // 如果码点值处于 surrogate pair 范围,替换为 0xfffd
          cp = 0xfffd
        } else if ((cp >= 0xfdd0 && cp <= 0xfdef) || (cp & 0xfffe) === 0xfffe) {
          // 如果码点值处于 `noncharacter` 范围,则什么都不做,交给平台处理
          // noop
        } else if (
          // 控制字符集的范围是:[0x01, 0x1f] 加上 [0x7f, 0x9f]
          // 却掉 ASICC 空白符:0x09(TAB)、0x0A(LF)、0x0C(FF)
          // 0x0D(CR) 虽然也是 ASICC 空白符,但需要包含
          (cp >= 0x01 && cp <= 0x08) ||
          cp === 0x0b ||
          (cp >= 0x0d && cp <= 0x1f) ||
          (cp >= 0x7f && cp <= 0x9f)
        ) {
          // 在 CCR_REPLACEMENTS 表中查找替换码点,如果找不到则使用原码点
          cp = CCR_REPLACEMENTS[cp] || cp
        }
        // 解码后追加到 decodedText 上
        decodedText += String.fromCodePoint(cp)
        // 消费掉整个数字字符引用的内容
        advance(body[0].length)
      } else {
        // 如果没有匹配,则不进行解码操作,只是把 head[0] 追加到 decodedText 并消费掉
        decodedText += head[0]
        advance(head[0].length)
      }
    }
  }
  return decodedText
}
2
3
4
5
6
7
8
9
10
11
12
13
14
15
16
17
18
19
20
21
22
23
24
25
26
27
28
29
30
31
32
33
34
35
36
37
38
39
40
41
42
43
44
45
46
47
48
49
50
51
52
53
54
55
56
57
58
59
60
61
62
63
64
65
66
67
68
69
70
71
72
73
在真正进行解码前,需要对码点的值进行合法性检查。WHATWG 规范中对此也有明确的定义。
解析插值与注释
解析插值
文本插值是 Vue.js 模板中用来渲染动态数据的常用方法。
<p>{{ count }}</p>
<p>{{ obj.foo }}</p>
<p>{{ obj.fn() }}</p>
2
3
我们通常将其两边的特殊字符串称为定界符,定界符中间的内容可以是任意合法的 JavaScript 表达式。
解析器在解析插值时,只需要把定界符中间的内容提取出来作为 JavaScript 表达式即可:
function parseInterpolation(context) {
  // 消费开始定界符
  context.advanceBy('{{'.length)
  // 找到结束定界符的位置索引
  closeIndex = context.source.indexOf('}}')
  // 截取中间内容作为插值表达式
  const content = context.source.slice(0, closeIndex)
  // 消费表达式和结束定界符
  context.advanceBy(content.length)
  context.advanceBy('}}'.length)

  return {
    type: 'Interpolation',
    content: {
      type: 'Expression',  // 表达式类型
      content: decodeHtml(content)
    }
  }
}
2
3
4
5
6
7
8
9
10
11
12
13
14
15
16
17
18
19
配合上面的 parseInterpolation 函数,解析如下模板内容:
const ast = parse(`<div>foo {{ bar }} baz</div>`)
最终将得到如下 AST:
const ast = {
  type: 'Root',
  chidlren: [
    {
      type: 'Element',
      tag: 'div',
      isSelfClosing: false,
      props: [],
      children: [
        { type: 'Text', content: 'foo ' },
        // 插值节点
        {
          type: 'Interpolation',
          content: [
            type: 'Expression',
            content: ' bar'
          ]
        },
        { type: 'Text', content: ' baz' },
      ]
    }
  ]
}
2
3
4
5
6
7
8
9
10
11
12
13
14
15
16
17
18
19
20
21
22
23
解析注释
解析注释的思路与解析插值非常相似:
function parseComment(context) {
  context.advanceBy('<!--'.length)
  closeIndex = context.source.indexOf('-->')
  const content = context.source.slice(0, closeIndex)
  context.advanceBy(content.length)
  context.advanceBy('-->'.length)

  return {
    type: 'Comment',
    content
  }
}
2
3
4
5
6
7
8
9
10
11
12
配合上面的 parseComment 函数,解析如下模板内容:
const ast = parse(`<div><!-- comments --></div>`)
最终得到如下 AST:
const ast = {
  type: 'Root',
  chidlren: [
    {
      type: 'Element',
      tag: 'div',
      isSelfClosing: false,
      props: [],
      children: [
        { type: 'Comment', content: ' comments ' },
      ]
    }
  ]
}
2
3
4
5
6
7
8
9
10
11
12
13
14