日常笔记
JavaScript
零碎
浏览器将输入内容解析后,拼接成完整的URL,其中的参数使用的是UTF-8编码,也就是我们开发时会常用的encodeURI和encodeURIComponent两个函数
encodeURI是对完整URL编码;encodeURIComponent是对URL参数部分编码,要求会更严格;
浏览器缓存的disk cache和memory cache分别是从磁盘读取和从内存中读取,通常刷新页面会直接从内存读,而关闭tab后重新打开是从磁盘读;
prefetch与preload
- 预加载prefetch是在空闲时间,以低优先级加载后续页面用到的资源;
- preload是以高优先级提前加载当前页面需要的资源;
async与defer
- 脚本的async是指异步加载,完成加载立刻执行
- defer是异步加载,完成HTML解析后再执行;
TCP握手需要三次的三次是为了保证客户端的存活,防止服务端资源的浪费,挥手要四次是因为TCP是双工通信,每一个方向的连接释放、应答各需要一次;
HTTPS的握手是为了协商出一个对称密钥,双方一共发送三个随机数,利用这三个随机数计算出只有双方知道的密钥,正式通信的内容都是用这个密钥进行加密的;
函数声明与函数表达式
( function(){…} )() 和 ( function (){…} () ) 是两种 JavaScript 立即执行函数的常见写法。
函数声明、函数表达式、匿名函数
函数声明:
function fnName () {…};使用 function 关键字声明一个函数,再指定一个函数名,叫函数声明。函数表达式:
var fnName = function () {…};使用 function 关键字声明一个函数,但未给函数命名,最后将匿名函数赋予一个变量,叫函数表达式,这是最常见的函数表达式语法形式。匿名函数:
function () {};使用 function 关键字声明一个函数,但未给函数命名,所以叫匿名函数。匿名函数有很多作用,赋予一个变量则创建函数,赋予一个事件则成为事件处理程序或创建闭包等等。(匿名函数属于函数表达式)
函数声明和函数表达式的不同
- JavaScript 引擎在解析 JavaScript 代码时会‘函数声明提升’(Function declaration Hoisting)当前执行环境(作用域)上的函数声明,而函数表达式必须等到JavaScript 引擎执行到它所在行时,才会从上而下一行一行地解析函 数表达式。
- 函数表达式后面可以加括号立即调用该函数,函数声明不可以,只能以
fnName()形式调用
// 正常,因为‘提升’了函数声明,函数调用可在函数声明之前
fnName();
function fnName(){}

// 报错,变量fnName还未保存对函数的引用,函数调用必须在函数表达式之后
fnName();
var fnName=function(){}

//🔥函数表达式后面加括号,当javascript引擎解析到此处时能立即调用函数
var fnName=function(){ alert('Hello World'); }();

//💥函数声明不会被调用。不会报错,但是javascript引擎只解析函数声明,忽略后面的括号
function fnName(){ alert('Hello World'); }();

//💥语法错误,虽然匿名函数属于函数表达式,但是未进行赋值操作
// 所以javascript引擎将开头的function关键字当做函数声明,报错:要求需要一个函数名
function(){ console.log('Hello World'); }();
2
3
4
5
6
7
8
9
10
11
12
13
14
15
16
17
立即执行函数的写法是一个括号包裹匿名函数,并后面加个括号立即调用函数。
✅ 要在函数体后面加括号就能立即调用,则这个函数必须是函数表达式,不能是函数声明。
(function(a){
    console.log(a);   //firebug输出123,使用()运算符
})(123);

(function(a){
    console.log(a);   //firebug输出1234,使用()运算符
}(1234));

!function(a){
    console.log(a);   //firebug输出12345,使用!运算符
}(12345);

+function(a){
    console.log(a);   //firebug输出123456,使用+运算符
}(123456);

-function(a){
    console.log(a);   //firebug输出1234567,使用-运算符
}(1234567);

var fn=function(a){
    console.log(a);   //firebug输出12345678,使用=运算符
}(12345678)
2
3
4
5
6
7
8
9
10
11
12
13
14
15
16
17
18
19
20
21
22
23
在 function 前面加!、+、 - 甚至是逗号等到都可以起到函数定义后立即执行的效果,而()、!、+、-、= 等运算符,都将函数声明转换成函数表达式,消除了JavaScript 引擎 识别函数表达式和函数声明的歧义,告诉 JavaScript 引擎这是一个函数表达式,不是函数声明,可以在后面加括号,并立即执行函数的代码。
加括号是最安全的做法,因为 !、+、- 等运算符还会和函数的返回值进行运算,有时造成不必要的麻烦。
JavaScript 中没用私有作用域的概念,如果在多人开发的项目上,你在全局或局部作用域中声明了一些变量,可能会被其他人不小心用同名的变量 给覆盖掉,根据 JavaScript 函数作用域链的特性,可以使用这种技术可以模仿一个私有作用域,用匿名函数作为一个“容器”,“容器”内部可以访问外 部的变量,而外部环境不能访问“容器”内部的变量,所以
( function(){…} )()内部定义的变量不会和外部的变量发生冲突,俗称“匿名包裹器”或“命名空间”。
sort
📗 sort是按照字符串ASCII码的顺序进行排序的,所以首先应该把数组元素都转化成字符串(如有必要),以便进行比较。
https://www.asciitable.com/
[1,2,4,9,11,12].sort()
// (6) [1, 11, 12, 2, 4, 9]  转化成字符串比较,1开始在前

['Ana', 'ana', 'john', 'John'].sort()
// (4) ['Ana', 'John', 'ana', 'john']  大写字母的ASCII值较小,排前面

['Ana', 'ana', 'john', 'John'].sort((a, b) => {
    if (a.toLowerCase() < b.toLowerCase()) { return -1;}
    if (a.toLowerCase() > b.toLowerCase()) { return 1; }
    return 0;
})
// (4) ['Ana', 'ana', 'john', 'John']  忽略大小写之后当前sort函数则无作用: a < b
2
3
4
5
6
7
8
9
10
11
12
如果希望小写字母排前面(或带有重音符号的字符),可以使用localeCompare方法:
['Ana', 'ana', 'john', 'John'].sort((a,b)=> a.localeCompare(b))
// (4) ['ana', 'Ana', 'john', 'John']

const names2 = ['Maève', 'Maeve'];
names2.sort((a, b) => a.localeCompare(b))
// (2) ['Maève', 'Maeve']
2
3
4
5
6
数组迭代器
📗 ES2015为Array类增加了一个@@iterator属性,需要通过Symbol.iterator来访问:
const numbers = [1,2,3,4,5];
let iterator = numbers[Symbol.iterator](); //获取数组迭代器
iterator.next().value; // 1
iterator.next().value; // 2
iterator.next().value; // 3
iterator.next().value; // 4
iterator.next().value; // 5
2
3
4
5
6
7
ES2015还增加了三种从数组中得到迭代器的方法: entries、keys和values
let aEntries = numbers.entries(); // 得到键值对的迭代器
console.log(aEntries.next().value); // [0, 1] - 位置0 的值为1
console.log(aEntries.next().value); // [1, 2] - 位置1 的值为2
console.log(aEntries.next().value); // [2, 3] - 位置2 的值为3

const aValues = numbers.values();
console.log(aValues.next()); // { value: 1, done: false }
console.log(aValues.next()); // { value: 2, done: false }
console.log(aValues.next()); // { value: 3, done: false }
2
3
4
5
6
7
8
9
可以使用for...of遍历迭代器
aEntries = numbers.entries();
for (const n of aEntries) {
	console.log(n);
}
2
3
4
ES6 module
使用ES6语法的导出export时,html页面引入该文件需要设置script标签的
type=“module”然后才能import:
import App from "./App.js"import "file.js"会这种方式引入会立即执行该js文件import App friom "file.js"在引入而未调用的情况下则不会
对象结构赋值
const jc = { article: "hello" };
const { article: hello } = jc;
console.log(hello);  // "hello"
2
3
weakMap与Map
基本上,Map和Set与其弱化版本之间仅有的区别是:
❑ WeakSet或WeakMap类没有entries、keys和values等方法; ❑ 只能用对象作为键。
- 创建和使用这两个类主要是为了性能。WeakSet和WeakMap是弱化的(用对象作为键),没有强引用的键。这使得JavaScript的垃圾回收器可以从中清除整个入口。
- 另一个优点是,必须用键才可以取出值。这些类没有entries、keys和values等迭代器方法,因此,除非你知道键,否则没有办法取出值。使用WeakMap类封装ES2015类的私有属性。
const items = new WeakMap();

class Stack {
    constructor () {
        items.set(this, []);
    }
    push(element){
        const s = items.get(this);
        s.push(element);
    }
    pop(){
        const s = items.get(this);
        const r = s.pop();
        return r;
    }
}
2
3
4
5
6
7
8
9
10
11
12
13
14
15
16
Symbol.iterator
🌐 迭代器模式 (opens new window)在新窗口打开
forEach:无法中断for...in:以任意顺序迭代一个对象的除 Symbol在新窗口打开 以外的 可枚举在新窗口打开 属性,包括继承的可枚举属性。(不应该用于迭代一个关注索引顺序的Array在新窗口打开。)for...of:在可迭代对象在新窗口打开(包括Array在新窗口打开,Map在新窗口打开,Set在新窗口打开,String在新窗口打开,TypedArray在新窗口打开,arguments在新窗口打开 对象等等)上创建一个迭代循环,调用自定义迭代钩子,并为每个不同属性的值执行语句。可中断,break、throw、return。
可迭代协议:对象上实现了 [Symbol.iterator] 方法,该函数返回一个迭代器。
当一个__可迭代对象__需要被迭代的时候,它的
Symbol.iterator方法被无参调用,然后返回一个用于在迭代中获得值的迭代器。 换句话说,一个对象(或其原型)上有符合标准的Symbol.iterator接口,那他就是可迭代的(Iterator),调用这个接口返回的对象就是一个迭代器。
有如下情况会使用可迭代对象的迭代行为:
for...of- 扩展运算符(Spread syntax)
yield*- 解构赋值( Destructuring assignment )
- 一些可接受可迭代对象的内置API(本质是这些接口在接收一个数组作为参数的时候会调用数组的迭代行为)
Array.from()Map(),Set(),WeakMap(),WeakSet()Promise.all()/Promise.race()等
const myArr = [1, 2, 3];
myArr[Symbol.iterator] = function () {
    const that = this;
    let index = that.length;
    return {
        next: function () {
            if (index > 0) {
                index--;
                return {
                    value: that[index],
                    done: false
                };
            } else {
                return {
                    done: true
                };
            }
        },
    };
};

console.log([...myArr])  // [3, 2, 1]
2
3
4
5
6
7
8
9
10
11
12
13
14
15
16
17
18
19
20
21
22
- 本质上:
for是个关键字,属于特殊语法,forEach是个函数,两者就不是一个东西,如果我要Array.prototype.forEach=console.log也可以啊,forEach只是一个包装出来的工具; - 语法上(常规功能使用上):都可用于遍历,
Array.prototype.forEach本质上就是遍历的包装(注意,只是Array),因为Array.prototype.forEach是ES5的产物,迭代器“iterator”是ES6的产物,很明显,前期版本forEach跟迭代器没啥关系(后期Array改不改,咱也不清楚啦,详情看 developer.mozilla.org在新窗口打开);Map和Set的forEach它们倒是跟迭代器相关;
 - 又一题外话:
for in是键值的遍历,属于特殊语法,for of是ES6的产物,它是迭代器的遍历方式,也属于特殊语法,不同的是for of需要对遍历对象进行一次判定,即存不存在Symbol.iterator属性,所以遍历空对象会报错,而for in不会;它们很像,但是原理不一样。
零散
命名规范
- 驼峰:CamelCase
- 大驼峰命名法:UpperCamelCase (pascak case)
- 小驼峰命名法:lowerCamelCase
- 蛇形命名法:snake_case
- 驼峰蛇形:Python_Case、user_Name
- 串式命名:kebab-case (train case、spinal case脊柱命名法)
devicePixelRatio
Window.devicePixelRatio: 当前显示设备的物理像素分辨率与CSS 像素(逻辑像素)分辨率之比。
DPR
- DPR:物理像素数 / 逻辑像素数
DPR = 2: 一个逻辑像素需要两个物理箱数来显示 2*2- iphone 6 的
375px是视口(逻辑)像素,DPR 为 2,所以 UI 按照物理像素750px进行设计
tablet 的 DPR 是 1.5,物理像素1920;我们页面的逻辑像素是 1920,到那边就只剩 1280 了
TypeScript
对象所有键
type ObjKey = keyof typeof obj;
Vue
父子组件方法传递
理解
子组件想要调用父组件的方法,可以直接传递Function类型
或直接父组件
@click=“event”,默认子组件为inheritAttrs: true会默认添加到子组件最外层标签📗 事件
@event=“handler“和属性一样都会被添加到子组件的最外层标签,这会将父组件的方法和属性传递给子组件。属性通过props接收,事件通过emits触发如果
inheritAttrs: false,可以绑定v-bind=“$attrs”给目标标签(这种情况相当于把所有事件和属性都绑定给了对应的标签,局限性比较大)最好的方式就是子组件
emit出自定义事件由父组件接收处理
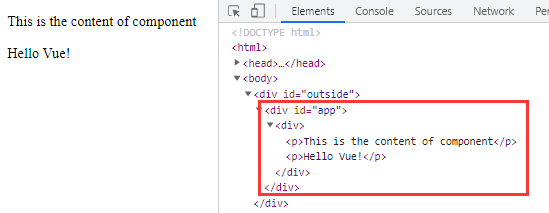
简易传送门组件
<body>
  <div id="app">
    <my-component></my-component>
  </div>
  <div id="outside"></div>

  <script src="../../dist/vue.js"></script>

  <script type="text/x-template" id="my-component">
      <div>
          <p>This is the content of component</p>
          <p>Hello Vue!</p>
      </div>
  </script>

  <script>
    Vue.component('my-component', {
      template: '#my-component'
    });
    var app = new Vue({
      el: '#app',
      data() {
        return {
          message: 'hello world'
        }
      },
      mounted() {
        const node = this.$el;
        document.querySelector("#outside").appendChild(node)
      },
      destroyed() {
        const node = this.$el;
        node.remove();
      }
    })
  </script>
</body>
2
3
4
5
6
7
8
9
10
11
12
13
14
15
16
17
18
19
20
21
22
23
24
25
26
27
28
29
30
31
32
33
34
35
36
37
$event
事件指令不写处理方法,也可以直接写代码,模板内可以直接使用$event参数得到原生事件对象或者自定义事件参数
<input :value="model" @input="model = $event.target.value" />

<button @click="console.log($event.target)">单击</button>
2
3
v-model
<JcInput :value="title" @update:value="(newVal)=> title = newValue" />

<JcInput :value="title" @update:value="title = $event" />

<JcInput v-model:value="model" />
2
3
4
5
📗 如果子组件props的名字是modelValue,即对应v-model:modelValue和事件@update:modelValue,可以简写成v-model
provide/inject
provide: { webName: "helloWorld" }
provide提供数据时如果希望使用this的引用,需要将provide转化为一个函数:
provide() {
  return { webName: this.webName}
}
2
3
provide注入的数据是非响应式的,为了解决这个问题可以:
提供一个js引用类型数据(对象)
provide() {
  return { webName: this.webName}
},
data() {
  return {
    webName: {
      label: "helloWorld"
    }
  }
}

// 子组件使用: webName.label
1
2
3
4
5
6
7
8
9
10
11
12如果还是希望使用基本数据类型,可以用computed将它包装成计算属性
provide() {
  return { webName: computed(()=> this.webName) }
}
1
2
3
📗 在组合式api中,如果希望数据时响应式的,因为ref已经包装成了引用类型数据:
let data = ref("hello");
provide('data', data);
provide('updateData', (newData)=> data.value = newData);
2
3
slot插槽
<slot name="header" :data="slotData">default content</slot>

<template #header="slotData">
  <div @click="show(slotData)">
    hello world
  </div>
</template>
2
3
4
5
6
7
在默认只有default一个插槽的情况下,可以直接在组件
v-slot="slotProps"或者#default="slotProps",且不需要套template标签通过props向子组件传递数据,子组件的插槽再通过
<slot :id="props.id" />给父组件插槽的组件传递数据,父组件的插槽位置组件便可以使用该数据<template> <div> <span>{{lesson.title}}</span> <slot :id="lesson.id" /> </div> </template> <script> export default { name: "Lesson", props: ["lesson"] } </script>1
2
3
4
5
6
7
8
9
10
11
12
13<template> <lesson v-for="lesson of lessons" :key="lesson.id" :lesson="lesson"> <template #default="{id}"> <button @click="del(id)">删除</button> </template> </lesson> </template>1
2
3
4
5
6
7
生命周期
- beforeCreate: 组件创建之前,this为undefined
- created:实例已经创建,但未渲染,this可以访问,但模板数据还未真正的挂载。所以还不能操作模板,this.$refs.el为undefined
- beforeMount:DOM被挂载之前,依然不能读取DOM元素
- mounted:DOM挂载完毕,可以访问模板
父组件 beforeCreate
父组件 created
父组件 beforeMount

子组件 beforeCreate
子组件 created
子组件 beforeMount
子组件 mounted

父组件 mounted
2
3
4
5
6
7
8
9
10
- beforeUpdate:更新之前,此时模板还未更新
- updated:视图更新完毕
- beforeUnmount:组件卸载之前
- unmounted:组件卸载完毕,适用于比如播放器/定时器的销毁
watchEffect
watchEffect
- 启动的时候就会被执行
- 函数声明内使用的响应式数据发生变化时会自动执行
- 返回值时一个可以停止监听的函数
let num = ref(3);

watch(num, (v)=> {
  if(v < 0) num.value = 0;
})

const stop = watchEffect(()=> {
  if(num.value < 0) num.value = 0;
})

// 让监听失效:stop()
2
3
4
5
6
7
8
9
10
11
setup中的ref
<template>
	<child ref="childRef" @change="handleChange" :init="3" />
  {{ handleChange() }}
</template>

<script>
import Child from "./components/child.vue";
import { ref, onMounted } from "vue";
export default {
  components: { Child },
  setup() {
    const childRef = ref();
		const handleChange = (v) => childRef.value?.num;
    return { childRef, handleChange }
  }
}
</script>
2
3
4
5
6
7
8
9
10
11
12
13
14
15
16
17
<template>
  <button @click="sub">sub</button>
  	{{ num }}
  <button @click="add">add</button>
</template>

<script>
import { ref, watchEffect } from "vue";
export default {
  props: { init: Number, default: 3 },
  emits: ['change'],
  setup(props, context) {
    const { emit, expose } = context;
    let num = ref(props.init);
    let add = ()=> {
      num.value++
      emit('change', num.value)
    }
    let sub = ()=> {
      num.value--
      emit('change', num.value)
    }
    watchEffect(()=> {
      if(num.value < 0) num.value = 0
      emit('change', num.vaue)
    })
    // 让child组件只暴露num属性
    expose({ num })
    return { num, add, sub }
  }
}
</script>
2
3
4
5
6
7
8
9
10
11
12
13
14
15
16
17
18
19
20
21
22
23
24
25
26
27
28
29
30
31
32
setup中的context
setup函数中的context包含了emit、expose、attrs和slots
- emit即
this.$emits - expose可以只将需要暴露的属性或方法声明给外部
- attrs即
this.$attrs,当使用该方法需要声明inheritAttrs: false - slots获取插槽:
const defaults = slots.default()返回一个组件数组
<!-- 显示父组件默认插槽内的第二个标签 -->
<component :is="defaults[1]" />
2
suspense
suspense组件可以处理全局异步问题,setup中使用await移步方法的时候不需要写async,当setup函数执行完后才会渲染组件。suspsense组件有两个插槽:
<suspense>
  <template #default>
    <div>
      <todo />
    </div>
  </template>
  <template #fallback>
    loading
  </template>
</suspense>
2
3
4
5
6
7
8
9
10
<script setup>
import { ref } from "vue"
const todos = ref([])
// setup中可以使用await
todos.value = await fetch(`http://127.0.0.1:3003/news`).then(res=> {
  return new Promise(resolve => {
    setTimeout(()=> resolve(res.json()), 2000)
  })
})
</script>
2
3
4
5
6
7
8
9
10
Transition
使用Transition组件,在未显示定义name属性的情况下,name默认为v,class如下:
{name}-enter-from
{name}-enter-active
{name}-enter-to

{name}-leave-from
{name}-leave-active
{name}-leave-to
2
3
4
5
6
7
除了直接定义class,组件自身也允许我们传入自定义动画类名,因此可借助animate.css(https://animate.style/)
appear允许初始加载的时候也有动画
<Transition
            appear
            enter-active-class="animate__animated animate__flip"
            enter-active-class="animate__animated animate__rotateOut"
            >
  <hello-world v-if="show" ></hello-world>
</Transition>
2
3
4
5
6
7
动画钩子函数
组件还提供了动画钩子函数动画钩子函数,可借助gsap帮助我们操作元素
<script setup>
import { ref } from 'vue'
import HelloWorld from './components/HelloWorld.vue'
const show = ref(false)

const beforeEnter = (el) => {
  gsap.set(el, {
    opacity: 0
  })
}

const enter = (el, done) => {
  gsap.to(el, {
    opacity: 1,
    duration: 2,
    onComplete: done
  })
}

const leave = (el, done) => {
  gsap.to(el, {
    opacity: 0,
    duration: 2,
    onComplete: done
  })
}
</script>

<template>
  <!-- beforeEnter enter afterEnter beforeLeave leave afterLeave -->
  <transition @before-enter="beforeEnter" @enter="enter" @leave="leave">
    <hello-world v-if="show">hello world</hello-world>
  </transition>
  <button @click="show = !show">切换</button>
</template>
2
3
4
5
6
7
8
9
10
11
12
13
14
15
16
17
18
19
20
21
22
23
24
25
26
27
28
29
30
31
32
33
34
35
多标签的动画过渡
对于多标签切换时位置抖动的问题:
- 将元素设置为绝对定位,外层套一个相对定位的父组件,切换时则是在原位置上切换
- 使用mode为
out-in,即当前元素先消失之后,另一个元素才出来
使用额外的class可以达到重写animate的duration的效果
<script setup>
import 'animate.css'
import { ref } from 'vue'
const action = ref('on')
</script>

<template>
  <section>
    <transition
      enter-active-class="animate__animated animate__zoomIn jc"
      leave-active-class="animate__animated animate__zoomOut jc"
      mode="out-in"
    >
      <button v-if="action == 'on'" @click="action = 'off'" class="on">开启</button>
      <button v-else @click="action = 'on'" class="off">关闭</button>
    </transition>
  </section>
</template>

<style lang="scss">
// section {
//   position: relative;
//   button {
//     position: absolute;
//   }
// }
.jc {
  animation-duration: 5s !important;
}
button {
  border: none;
  padding: 5px 10px;
  color: #fff;
  &.on {
    background-color: #16a085;
  }
  &.off {
    background-color: #d35400;
  }
}
</style>
2
3
4
5
6
7
8
9
10
11
12
13
14
15
16
17
18
19
20
21
22
23
24
25
26
27
28
29
30
31
32
33
34
35
36
37
38
39
40
41
42
TransitionGroup
动画组
可以一次性控制所有子元素的动画效果,同时还有v-move允许我们配置其余元素位置移动时的动画效果
enter时为不同index元素设置不同的动画延迟时间,达到按序动画的效果appear允许初始化就出现该动画todo-move定义了其他元素移动的平滑过渡动画todo-leave-active设置元素消失时为绝对定位,不占空间(外层使用当前组件要套一个相对定位元素),让后面元素平滑上移
<script setup>
import gsap from 'gsap'

const prop = defineProps({
	duration: { default: 0.6 },
	delay: { default: 0.2 },
	tag: { default: null }
})
const beforeEnter = (el) => {
	gsap.set(el, {
		opacity: 0
	})
}

const enter = (el, done) => {
	gsap.to(el, {
		opacity: 1,
		duration: prop.duration,
		delay: el.dataset.index * prop.delay,
	})
}

</script>

<template>
	<transition-group :tag="tag" appear name="todo" @before-enter="beforeEnter" @enter="enter">
		<slot />
	</transition-group>
</template>

<style lang="scss">
.todo-leave-to {
	opacity: 0;
	transform: scale(0);
}
.todo-leave-active {
	transition: 1s ease;
	position: absolute;
}
.todo-move {
	transition: all 1s ease;
}
</style>
2
3
4
5
6
7
8
9
10
11
12
13
14
15
16
17
18
19
20
21
22
23
24
25
26
27
28
29
30
31
32
33
34
35
36
37
38
39
40
41
42
43
vue-router
页面兜底
:any(.*)这边括号内的正则即匹配除了换行外的一个或多个字符,any表示任意参数,可随意path: "/:any(.*)"1RouterView组件
<router-view #default="{route, Component}">
	<div :class="route.meta?.class">
        <component :is="Component" />
    </div>
</router-view>
1
2
3
4
5
命名视图
同一个页面当中可以使用多个RouterView组件,不同的视图设置不同的name,默认上default。对应的路由的定义当中components属性:
let route = {
  path: "/",
  name: "home",
  components: {
    default: CustomNavigation,  // 默认试图渲染的组件
		navigation: HomeView  // navigation视图组件,如果有,在渲染时代替DefaultNavigation
  }
}
2
3
4
5
6
7
8
<router-view name="navigation" #default="{ Component }">
  <component :is="Component ?? DefaultNavigation" />
</router-view>
<router-view name="default" />
2
3
4
路由别名
route配置中有alias属性,它可以是string或array,为当前页面设置其它的路径
alias: "/:id(\\d+).html"     // ‘/123.html’
alias: ["/hello", "/world"]
2
路由守卫
路由的守卫包括全局守卫,路由中定义的守卫和组件路由守卫
当页面跳转时
- beforeRouteLeave 离开组件
- beforeEach 全局前置守卫
- beforeEnter 路由前置守卫
- beforeRouteEnter 组件前置守卫
- beforeResolve 全局解析守卫
- afterEach 全局后置守卫
router.beforeEach((to, from)=> {
  // return true/false

  // return new Promise((resolve, reject)=> {
  //   setTimeout(()=> resolve(true), 2000)
  // })

  // return await new Promise((resolve)=> {
  //   resolve(false)
  // })

  // if(to.name === "about") next('/login')
  // else next()
  if(to.name === "about") return '/login'   // return from
})
2
3
4
5
6
7
8
9
10
11
12
13
14
15
当路由更新时
- beforeEach 全局前置守卫
- beforeRouteUpdate 组件更新守卫
- beforeResolve 全局解析守卫
- afterEach 全局后置守卫
组件路由守卫的使用
const loadData = async ()=> {
  return await new Promise(resolve=> {data: '1'})
}
beforeRouteEnter((ro, from, next)=> {
  next(async (vm)=> {
    vm.data = await loadData()
  })
})
async beforeRouteUpdate() {
  this.data = await loadData()
}
2
3
4
5
6
7
8
9
10
11
scrollBehavior
路由创建时允许传入scrollBehavior属性来调整路由跳转后到滚动效果
scrollBehavior(to, from, savedPosition) {
  // savedPosition 页面返回时定位到之前浏览到位置
  // el 指定要滚动到的元素位置
  // 这个函数也可以返回Promise,来处理异步情况
  return savedPosition ?? { el: '.page', top: 0, behavior: 'smooth'}
}
2
3
4
5
6
页面懒加载
ES6动态加载模块,将页面组件打包成独立的js文件,使用时再加载
component: ()=> import('@/views/home.vue')
Vite分包加载
也可以将某一类文件打包成单独文件,在vite中的配置如下:
import { defineCOnfig } from 'vite'
import vue from '@vitejs/plugin-vue'
import path from 'path'

export default defineConfig({
  plugins: [vue()],
  resolve: {
    alias: {
      '@': path.resolve(__dirname, 'src')
    }
  },
  build: {
    rollupOptions: {
      output: {
        manualChunks: {
          // 将这三个页面组件打包成'hello.hash[8].js'文件
          hello: [
            './src/views/home.vue',
            './src/views/about.vue',
            './src/views/article.vue',
          ]
        }
      }
    }
  }
})
2
3
4
5
6
7
8
9
10
11
12
13
14
15
16
17
18
19
20
21
22
23
24
25
26