选择器
基本选择器
| 选择器 | 示例 | 描述 |
|---|---|---|
| .class | .intro | 选择 class="intro" 的所有元素 |
| #id | #firstname | 选择 id="firstname" 的所有元素 |
| * | * | 选择所有元素 |
| element | p | 选择所有元素 |
| element,element | div,p | 选择所有元素和所有元素 |
| element element | div p | 选择元素内部的所有元素 |
| element>element | div>p | 选择父元素为元素的所有元素 |
| element+element | div+p | 选择紧接在元素之后的所有元素 |
标签选择
使用 * 可为所有元素设置样式。
* {
    text-decoration: none;
    color: #6c757d;
}
2
3
4
根据标签为元素设置样式
h1 {
    color: red;
}
2
3
同时设置多个元素组合
h1,h2 {
    color: red;
}
2
3
元素在多个组件中存在
h1,h2 {
    color: red;
}
h1,h3{
    background: #dcdcdc;
}
2
3
4
5
6
类选择器
类选择器是为一类状态声明样式规则,下面是把文本居中定义为类样式。
<style>
    .text-center {
        text-align: center;
    }
</style>

<h1 class="text-center">google.com</h1>
<h2 class="text-center">mdn.com</h2>
2
3
4
5
6
7
8
将类选择器指定为具体标签
.help-block {
    background: red;
}

span.help-block {
    font-size: 12px;
    color: #aaa;
    background: none;
}
...

<span class="help-block">content</span>
2
3
4
5
6
7
8
9
10
11
12
ID选择器
为有 id 属性的元素设置样式
#container {
    background: red;
}

...
<h1 id="container">google.com</h1>
2
3
4
5
6
👾 文档中ID应该是唯一的,虽然为多个元素设置同一个ID也可以产生样式效果,但这是不符合规范的。
🧐 建议优先使用类选择器
结构选择器
| 选择器 | 示例 | 描述 |
|---|---|---|
| element element | div p | 选择元素内部的所有元素 |
| element>element | div>p | 选择父元素为元素的所有元素 |
| element+element | div+p | 选择紧接在元素之后的元素(单个) |
| element~element2 | p~ul | 选择元素同级并在元素后面的所有元素 |
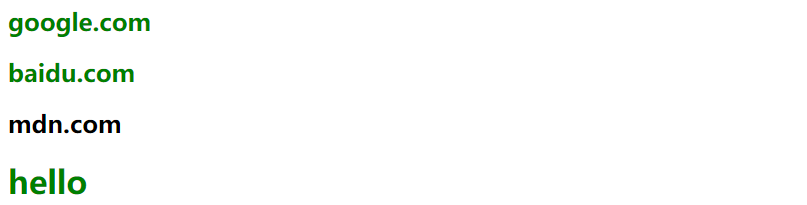
后代选择器
📗 HTML中元素是以父子级、兄弟关系存在的。后代选择器指元素后的元素(不只是子元素,是后代元素)。
<style>
    main article h2,
    main h1 {
        color: green;
    }
</style>
...
<main>
    <article>
        <h2 name="google">google.com</h2>
        <aside>
            <h2>baidu.com</h2>
        </aside>
    </article>
    <h2 name="mdn.com">mdn.com</h2>
    <h1>hello</h1>
</main>
2
3
4
5
6
7
8
9
10
11
12
13
14
15
16
17
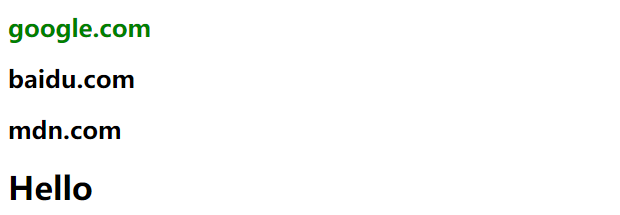
子元素选择
📗 子元素选择器中选择子元素,不包括孙级及以下元素。
<style>
    main article>h2 {
        color: green;
    }
</style>
...

<main>
	<article>
		<h2 name="google">google.com</h2>
		<aside>
			<h2>baidu.com</h2>
		</aside>
	</article>
	<h2 name="mdn.com">mdn.com</h2>
	<h1>Hello</h1>
</main>
2
3
4
5
6
7
8
9
10
11
12
13
14
15
16
17
紧邻兄弟元素
用于选择紧挨着的同级兄弟元素。
<style>
    main article+h2 {
        color: green;
    }
</style>
...

<main>
	<article>
		<h2 name="google">google.com</h2>
		<aside>
			<h2>baidu.com</h2>
		</aside>
	</article>
	<h2 name="mdn.com">mdn.com</h2>
	<h1>Hello</h1>
</main>
2
3
4
5
6
7
8
9
10
11
12
13
14
15
16
17

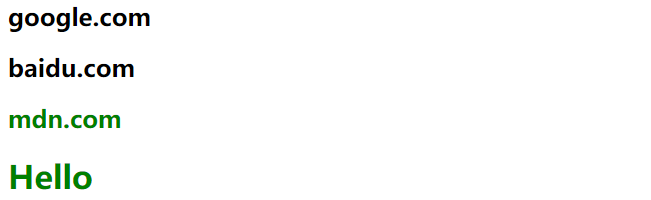
后面兄弟元素
用于选择后面的所有兄弟元素。
<style>
    main article~* {
        color: green;
    }
</style>
...

<main>
	<article>
		<h2 name="google">google.com</h2>
		<aside>
			<h2>baidu.com</h2>
		</aside>
	</article>
	<h2 name="mdn.com">mdn.com</h2>
	<h1>Hello</h1>
</main>
2
3
4
5
6
7
8
9
10
11
12
13
14
15
16
17
属性选择器
根据属性来为元素设置样式也是常用的场景。
| 选择器 | 示例 | 描述 |
|---|---|---|
| [attribute] | [target] | 带有 target 属性所有元素 |
| [attribute=value] | [target=_blank] | targe 属性 等于"_blank" 的所有元素 |
| [attribute~=value] | [title~=google] | title 属性包含单词 "google" 的所有元素 |
| [attribute|=value] | [title|=prop] | title 属性值为 "prop"的单词,或"hh-prop"以-连接的的独立单词 |
| [attribute*=value] | a[src*="mdn"] | src 属性中包含 "mdn" 字符的每个 a元素 |
| [attribute^=value] | a[src^="https"] | src 属性值以 "https" 开头的每个 a元素 |
| [attribute$=value] | a[src$=".jpeg"] | src 属性以 ".jpeg" 结尾的所有 a元素 |
为具有 class 属性的h1标签设置样式
<style>
    h1[class] {
        color: red;
    }
</style>

<h1 class="container">google.com</h1>
2
3
4
5
6
7

约束多个属性
<style>
    h1[class][id] {
        color: red;
    }
</style>

<h1 class="container" id>google.com</h1>
2
3
4
5
6
7
= 相等
具体属性值设置样式
<style>
    a[href="https://www.google.com"] {
        color: green;
    }
</style>

<a href="https://www.google.com">Google</a>
<a href="">Baidu</a>
2
3
4
5
6
7
8

^= 开始匹配
^ 以指定值开头的元素
h2[name^="mdn"] {
    color: red;
}
...

<h2 name="google">google.com</h2>
<h2 name="mdn.com">mdn.com</h2>
2
3
4
5
6
7

$= 结束匹配
$ 以指定值结尾的元素
<style>
    h2[name$="gle"] {
        color: red;
    }
</style>

<h2 name="google">google.com</h2>
<h2 name="mdn.com">mdn.com</h2>
2
3
4
5
6
7
8

*= 任意匹配
* 属性内部任何位置出现值的元素
<style>
    h2[name*="google"] {
        color: red;
    }
</style>
<h2 name="google">google.com</h2>
<h2 name="google.com">mdn.com</h2>
2
3
4
5
6
7

~= 包含匹配 💡
~ 属性值中包含指定词汇的元素
注意 📌 :这边的<h2 name="google.com">mdn.com</h2>不符合包含google这个词汇的要求,如果是<h2 name="google web">mdn.com</h2>这种情况才会被这个选择器匹配到。
<style>
    h2[name~="google"] {
        color: red;
    }
</style>
<h2 name="google">google.com</h2>
<h2 name="google.com">mdn.com</h2>
2
3
4
5
6
7
|= -连接匹配 💡
| 以指定值开头或以属性连接破折号-的元素
<style>
    h2[name|="google"] {
        color: red;
    }
</style>
<h2 name="google">google.com</h2>
<h2 name="google-web">mdn.com</h2>
2
3
4
5
6
7
伪类选择器 👾
为元素的不同状态或不确定存在的元素设置样式规则。
| 状态 | 示例 | 说明 |
|---|---|---|
| :link | a:link | 选择所有未被访问的链接 |
| :visited | a:visited | 选择所有已被访问的链接 |
| :hover | a:hover | 鼠标移动到元素上时 |
| :active | a:active | 点击正在发生时 |
| :focus | input:focus | 选择获得焦点的 input 元素 |
| :root | :root | 选择文档的根元素即html。 |
| :empty | p:empty | 选择没有子元素的每个元素(包括文本节点)。 |
| :first-child | p:first-child | 选择属于父元素的第一个子元素的每个元素 |
| :last-child | p:last-child | 选择属于其父元素最后一个子元素每个元素。 |
| :first-of-type | p:first-of-type | 选择属于其父元素的首个元素的每个元素 |
| :last-of-type | p:last-of-type | 选择属于其父元素的最后元素的每个元素。 |
| :only-of-type | p:only-of-type | 选择属于其父元素唯一的元素的每个元素。 |
| :only-child | p:only-child | 选择属于其父元素的唯一子元素的每个元素。 |
| :nth-child(n) | p:nth-child(2) | 选择属于其父元素的第二个子元素的每个元素。 |
| :nth-child(odd) | p:nth-child(odd) | 选择属于其父元素的奇数元素。 |
| :nth-child(even) | p:nth-child(even) | 选择属于其父元素的偶数元素。 |
| :nth-of-type(n) | p:nth-of-type(2) | 选择属于其父元素第二个元素的每个元素。 |
| :nth-last-child(n) | p:nth-last-child(2) | 同上,从最后一个子元素开始计数。 |
| :nth-last-of-type(n) | p:nth-last-of-type(2) | 同上,但是从最后一个子元素开始计数。 |
| :not(selector) | :not(p) | 选择非元素的每个元素 |
:超链接伪类
定义链接的不同状态
<style>
    a:link {
        color: red
    }

    a:visited {
        color: green
    }

    a:hover {
        color: blue
    }

    a:active {
        color: yellow
    }
</style>
<a href="javascript:;">链接</a>
2
3
4
5
6
7
8
9
10
11
12
13
14
15
16
17
18

不只是链接可以使用伪类,其他元素也可以使用。下面是对表单的点击与获取焦点状态的样式设置。
<style>
    input:focus {
        background: green;
    }

    input:hover {
        background: blue;
    }

    input:active {
        background: yellow;
    }
</style>
<input type="text">
2
3
4
5
6
7
8
9
10
11
12
13
14

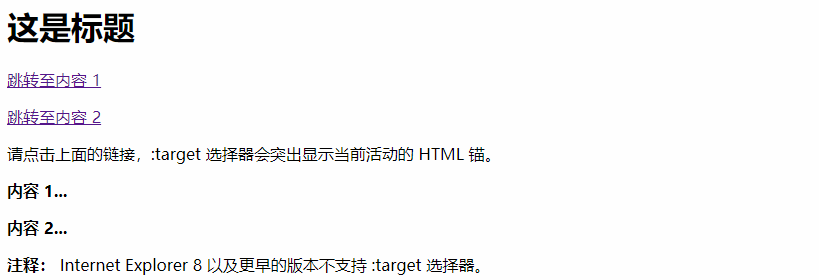
:target
用于控制具有锚点目标元素的样式
:target {
    border: 2px solid #D4D4D4;
    background-color: #e5eecc;
}
2
3
4
<h1>这是标题</h1>

<p><a href="#news1">跳转至内容 1</a></p>
<p><a href="#news2">跳转至内容 2</a></p>

<p>请点击上面的链接,:target 选择器会突出显示当前活动的 HTML 锚。</p>

<p id="news1"><b>内容 1...</b></p>
<p id="news2"><b>内容 2...</b></p>

<p><b>注释:</b> Internet Explorer 8 以及更早的版本不支持 :target 选择器。</p>
2
3
4
5
6
7
8
9
10
11
:root
根元素选择伪类即选择html
:root {
    font-size: 100px;
}
2
3
:empty
没有内容和空白的元素。下面第一个p标签会产生样式,第二个不会因为有空白内容
<style>
    p {
        height: 20px;
        border: 1px solid;
    }
    :empty {
        border: solid 2px red;
    }
</style>

<p></p>
<p> </p>
2
3
4
5
6
7
8
9
10
11
12
结构伪类
下面来通过结构伪类选择器选择树状结构中的标签元素。
区别
- :last-child表示其父元素的最后一个子元素,且这个元素是css指定的元素,才可以生效
- :last-of-type代表在一群兄弟元素中的最后一个指定类型的元素
:first-child
选择元素中span 标签并且是第一个。
<style>
    article span:first-child {
        color: red;
    }
</style>

<article>
    <!-- span必须是当前article的第一个子元素 -->
    <span>1</span>
    <span>2</span>
    <aside>
        <span>3</span>
        <span>4</span>
    </aside>
</article>
2
3
4
5
6
7
8
9
10
11
12
13
14
15

:first-of-type
选择类型是span 的第一个元素
<style>
    article span:first-of-type {
        color: red;
    }
</style>

<article>
    <!-- div元素不影响 会找第一个span标签 -->
    <div></div>
    <span>1</span>
    <span>2</span>
    <aside>
        <span>3</span>
        <span>4</span>
    </aside>
</article>
2
3
4
5
6
7
8
9
10
11
12
13
14
15
16
:last-child
选择元素中span 标签并且是最后一个。
<style>
    article span:last-child {
        color: red;
    }
</style>

<article>
    <span>1</span>
    <span>2</span>
    <aside>
        <span>3</span>
        <span>4</span>
    </aside>
    <span>5</span>
</article>
2
3
4
5
6
7
8
9
10
11
12
13
14
15

:last-of-type
选择类型为span 的最后一个元素
<style>
    article span:last-of-type {
        color: red;
    }
</style>

<article>
    <span>1</span>
    <span>2</span>
    <aside>
        <span>3</span>
        <span>4</span>
    </aside>
    <span>5</span>
    <!-- div元素不影响 会找最后一个span标签 -->
    <div></div>
</article>
2
3
4
5
6
7
8
9
10
11
12
13
14
15
16
17
:only-child
选择是唯一子元素的span 标签(👾 第一个span标签当前层级还有aside,该选择器不会作用到)
<style>
    article span:only-child {
        color: red;
    }
</style>

<article>
    <span>google.com</span>
    <aside>
        <span>baidu.com</span>
    </aside>
</article>
2
3
4
5
6
7
8
9
10
11
12

:only-of-type
选择同级中类型是span 的唯一子元素(👾 都满足是当前层级的唯一span类型标签)
<style>
    article span:only-of-type {
        color: red;
    }
</style>

<article>
    <span>google.com</span>
    <aside>
        <span>baidu.com</span>
    </aside>
</article>
2
3
4
5
6
7
8
9
10
11
12

:nth-child(n)
选择第二个元素并且是span标签的
<style>
    article span:nth-child(2) {
        color: red;
    }
</style>

<article>
    <span>google.com</span>
    <aside>
        <span>baidu.com</span>
        <span>wiki.com</span>
    </aside>
</article>
2
3
4
5
6
7
8
9
10
11
12
13

:nth-of-type(n)
选择第二个span 元素,不管中间的其他元素
<style>
    article span:nth-of-type(2) {
        color: red;
    }
</style>

<article>
    <span>google.com</span>
    <aside>
        <span>baidu.com</span>
        <span>wiki.com</span>
    </aside>
    <span>MDN.com</span>
</article>
2
3
4
5
6
7
8
9
10
11
12
13
14

计算数量
📗 n为0/1/2/3... ,下面是隔列变色
<style>
    table tr>td:nth-child(2n+1) {
        background: green;
        color: white;
    }
</style>

<table border="1">
    <tr>
        <td>1</td>
        <td>2</td>
        <td>3</td>
        <td>4</td>
        <td>5</td>
    </tr>
</table>
2
3
4
5
6
7
8
9
10
11
12
13
14
15
16

从第三个开始设置样式
table tr>td:nth-child(n+3) {
    background: rgb(128, 35, 2);
    color: white;
}
2
3
4

设置前三个元素
table tr>td:nth-child(-n+3) {
    background: rgb(128, 35, 2);
    color: white;
}
2
3
4

奇数元素 odd
选择奇数单元格
table tr>td:nth-child(odd) {
    background: green;
    color: white;
}
2
3
4
偶数元素 even
选择偶数单元格
table tr>td:nth-child(even) {
    background: green;
    color: white;
}
2
3
4
:nth-last-child(n)
从最后一个元素开始获取
table tr>td:nth-last-child(2n+1){
    background: green;
    color: white;
}
2
3
4
取最后两个元素
main>ul li:nth-last-child(-n+2) {
	color: red;
}
2
3

:nth-last-of-type(n)
从最后一个元素开始选择span 标签 。
article span:nth-last-of-type(1) {
    background: red;
    color: white;
}
2
3
4
:not(selector)
排除第一个li元素
<style>
    ul li:not(:nth-child(1)) {
        background: red;
    }
</style>

<ul>
    <li>google.com</li>
    <li>mdn.com</li>
    <li>baidu.com</li>
</ul>
2
3
4
5
6
7
8
9
10
11

表单伪类
| 选择器 | 示例 | 说明 |
|---|---|---|
| :enabled | input:enabled | 选择每个启用的 input 元素 |
| :disabled | input:disabled | 选择每个禁用的 input 元素 |
| :checked | input:checked | 选择每个被选中的 input 元素 |
| :required | input:required | 包含required属性的元素 |
| :optional | input:optional | 不包含required属性的元素 |
| :valid | input:valid | 验证通过的表单元素 |
| :invalid | input:invalid | 验证不通过的表单 |
表单属性样式
<style>
    input:enabled {
        background: red;
    }

    input:disabled {
        background: #dddddd;
    }

    input:checked+label {
        color: green;
    }
</style>
<input type="text" disabled>
<input type="text" name="info">

<input type="radio" name="sex" checked id="boy">
<label for="boy">男</label>
<input type="radio" name="sex" checked id="girl">
<label for="girl">女</label>
2
3
4
5
6
7
8
9
10
11
12
13
14
15
16
17
18
19
20

表单必选样式
<style>
    input:required {
        border: solid 2px blue;
    }

    input:optional {
        background: #dcdcdc;
        border: none;
    }
</style>
<input type="text" name="title" required>
<input type="text" name="name">
2
3
4
5
6
7
8
9
10
11
12

表单验证样式
<style>
    input:valid {
        border: solid 1px blue;
    }

    input:invalid {
        border: solid 1px red;
    }
</style>

<form>
    <input type="email">
    <button>保存</button>
</form>
2
3
4
5
6
7
8
9
10
11
12
13
14

字符伪类
| 状态 | 示例 | 说明 |
|---|---|---|
| ::first-letter | p:first-letter | 选择每个元素的首字母 |
| ::first-line | p:first-line | 选择每个元素的首行 |
| ::before | p:before | 在每个元素的内容之前插入内容 |
| ::after | p:after | 在每个元素的内容之后插入内容 |
段落首行处理
p::first-line {
 font-size: 20px;
}
2
3
首字母大写
p::first-letter {
    font-size: 30px;
}
2
3

在元素前添加
<style>
    span::before {
        content: '⇰';
        color: red;
    }

    span::after {
        content: '⟲';
        color: green;
    }
</style>

<span>Hello world</span>
2
3
4
5
6
7
8
9
10
11
12
13

搜索框示例
div {
    border: solid 1px #ddd;
    width: 150px;
}

div>input[type="text"] {
    border: none;
    outline: none;
}

div>input[type="text"]+span:after {
    content: "\21AA";
    font-size: 14px;
    cursor: pointer;
}
2
3
4
5
6
7
8
9
10
11
12
13
14
15
添加属性内容 💡
<style>
    p:before {
        content: attr(data-foo) " ";
    }
</style>

<p data-foo="hello">world</p>
2
3
4
5
6
7

<style>
    h2::before {
        content: attr(title);
    }
</style>

<h2 title="this is h2 title ">hello world</h2>
2
3
4
5
6
7
